Step by Step Process to Install AutoCAD on Windows Free

Mục lục bài viết
Introduction to Installation of AutoCAD
AutoCAD is a Computer-Aided Drafting (CAD) software application built by Autodesk. It helps to create both 2D (Two dimensional) and 3D( Three-Dimensional) models of solid as well as mesh surfaces which helps engineers, architects, drafters, and other designing professionals to design the models instead of using manual hand drafting tools like pencils, rulers, compasses, drafting boards, etc. These conventional methods are time-consuming as well as not accurate. AutoCAD released in 1982; since then, it is used widely because of its accuracy, robust features, and automated drafting tools. AutoCAD helps you design and create the models, transform that model into 3D model renderings, and create animated presentations.
AutoCAD provides many built-in layouts for users. This built-in layout contains various types of templates that are used for architecture planning and constructing buildings. In this article, we are going to see the steps to install AutoCAD on the windows system so that we can use that to create designs.
Start Your Free Design Course
3D animation, modelling, simulation, game development & others
How to Install AutoCAD on Windows Free?
AutoCAD offers several subscription plans that cater to different needs and budgets. Here are the main subscription plans available:
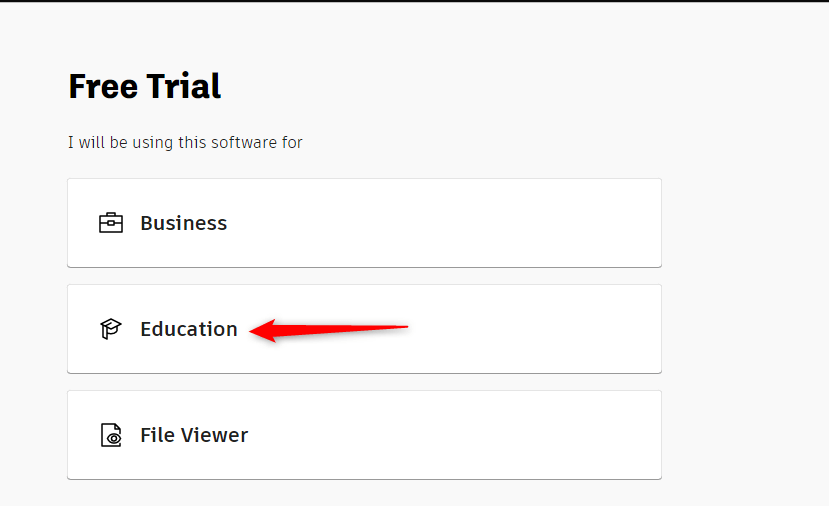
AutoDesk offers free educational access to AutoCAD for students and educators through their AutoCAD for Students and Educators program. You can download and install the software on your computer by creating an account and verifying your eligibility.
Autodesk also offers a free trial version of AutoCAD that you can use for a limited time period. You can download and install the trial version from the Autodesk website and use it for 30 days.

Steps to Install AutoCAD on the windows system are given as follows:
Step 1: Access the Autodesk website
Use web browsers like Google Chrome, Mozilla Firefox, etc. Then Go to the AutoCAD official website by using this link: https://www.autodesk.com.
Step 2: Select Students and Educators from Drop down list of the Menu.
It will give you three options, i.e. free trials, students and educators, and worldwide sites. Here I am selecting the students and educators option.
Step 3: Then, you will see Get set up for career success with the Autodesk tab. From that tab, click on Start now under the Download free software option.
Step 4: It will give a list of Autodesk products like 3DS Max, Maya, AutoCAD, etc. Under that, click on the AutoCAD option from the list.
Step 5: If you have already registered, then click on Sign in, and you will be forwarded to your Autodesk Login information. Otherwise, click on Create Account and create a new account using your email ID.
Step 6: Select the version
After signing in, you can select the version of AutoCAD you want to download and install and Operating System: 32-bit or 64-bit.
Note: To check whether your operating system is 32-bit or 64-bit go to Control Panel > System and Security > System. It will display whether you are running a 32 bits system or 64 bits system.
Then choose a language which is preferable for you.
The Serial number and product key will be displayed. Copy this information as it is required for activation purposes after installing the software to authenticate the download.
Now click on download. You will see a prompt with a security warning from the download. In that prompt, click “Run” or “Ok” (which is applicable to continue the download process), as Autodesk products are relatively secure.
Step 7: License and Services Agreement
After that, you will see the “License and Services Agreement” Prompt. Read it carefully, and then click on the “I Accept” option, then click the next button to install AutoCAD on your Windows System.
The AutoCAD Download Manager will be displayed. This can take some time.
Step 8: After the installation of the manager, you will see an “Autodesk Download Manager” window. Specify the desired path where you want to save that file and click on OK.
The Autodesk Download manager will be loading. This may take some time.
Step 9: After that, you will see a window where you can configure the Autocad installation process. Here give the path where you want to save the files.
Step 10: In the next window, select the Custom Option. Make sure all the features under the drop-down are checked.
Step 11: Then, you will be prompted to the next window. Then click on the Install option.
Step 12: After installing all the products and tools related to AutoCAD, Click on Finish.
Step 13: After finishing the installation, you have to provide a Product Key to further the use of AutoCAD.
In case you haven’t copied the Product Key previously, Sign in to your AutoDesk account on the website -> Click on your username -> Click on AutoDesk Account.
Step 14: Click on the “All Products and Services” option. This will show the products you have downloaded.
Step 15: Under the AutoCAD option, Click on the “More actions” drop-down -> click “Serial numbers”.
Now you can see the Serial Numbers and the Product Keys of all the products which you have downloaded. Copy this information and activate your Autodesk product.
Now you can use AutoCAD software and design your own models easily.
Conclusion – Install AutoCAD
In this article, we have seen the definition of Autocad and some briefs with that, we also have seen the installation process of Autocad in the step-by-step method.
Recommended Articles
This has been a guide to Installing AutoCAD. Here we discussed the Concept and Steps by Steps Process to Install AutoCAD on the Windows System. You can also go through our other Suggested Articles to learn more –