
How to Install .NET Framework 3.5 on Windows 11/10 and Windows Server? | Windows OS Hub
Most modern Windows apps require the .NET Framework to be installed. For example, NET Framework 4.8 is installed by default on Windows 11/10 and Windows Server 2022/2019. However, some old and legacy applications require the .NET Framework 3.5, 2.0, or even 1.0 to be installed.
In this article, we’ll walk you through how to install .NET 3.5 on Windows 11/10/8.1 and Windows Server 2022/2019/2016/2012R2.
Mục lục bài viết
Installing .NET Framework 3.5 on Windows 11 and 10
Check that .NET Framework 3.5 (includes .NET 2.0 and 3.0) is not installed on your computer. Open a PowerShell console as an administrator and run the command:
Get-WindowsCapability -Online -Name NetFx3
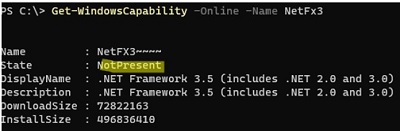
In our case, .NET 3.5 is not installed (State=NotPresent).
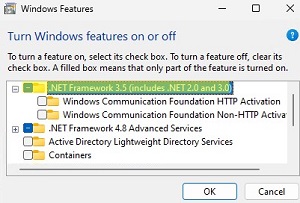
On Windows 10/11, you can install the .Net Framework from the Turn Windows Features on or off panel:
- Run the command
optionalfeatures.exe; - Select .NET Framework 3.5 (includes .NET 2.0 and 3.0) in the list of components, click OK;
- If your computer has direct Internet access, select “Let Windows Update download the files for you”;
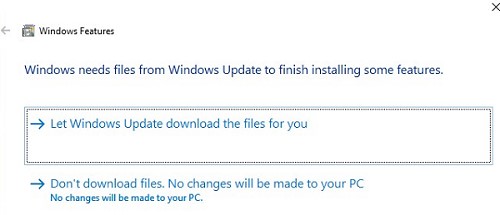
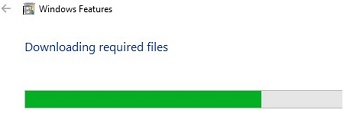
- Windows will download and install the latest version of the .NET Framework 3.5 component from the Microsoft Update servers.
- Using DISM:
DISM /online /Enable-Feature /FeatureName:"NetFx3" - Or with PowerShell:
Enable-WindowsOptionalFeature -Online -FeatureName "NetFx3"
You can also install .NET Framework 3.5 from the command line:
If your computer is not connected to the Internet or disconnected from the network, then an error will appear when installing .NET 3.5:
Windows couldn’t complete the requested changes.
The changes couldn’t be completed. Please reboot your computer and try again
Error code: 0x8024402C

In this case, you can manually install the NET 3.5 feature from your Windows installation media. To do this, you will need an installation USB flash drive or an ISO image file with your Windows version (how to check the version of Windows in an ISO image):
- Connect your media with the Windows installation image to your computer. In my case, I have the file Windows 11 ISO image file. Click on the file and choose Mount to connect the image to a virtual DVD drive (or use the PowerShell command:
Mount-DiskImage -ImagePath "C:\ISO\Windows11-22h2.iso"); - In my case, the virtual drive with the image was assigned the drive letter
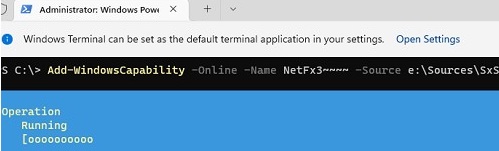
E:(we will use this drive letter in the following commands); - To install .Net 3.5 from the component source files on the installation disk, use the command:
DISM /online /enable-feature /featurename:NetFX3 /All /Source:E:\sources\sxs /LimitAccess
Or (a similar PowerShell command):
Add-WindowsCapability -Online -Name NetFx3~~~~ -Source E:\Sources\SxS
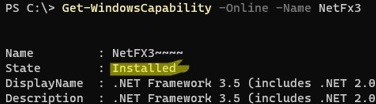
To make sure that the .NET Framework is successfully installed, run the command:
Get-WindowsCapability -Online -Name NetFx3~~~~
Name         : NetFX3~~~~
State        : Installed
DisplayName  : .NET Framework 3.5 (includes .NET 2.0 and 3.0)
Description  : .NET Framework 3.5 (includes .NET 2.0 and 3.0)
DownloadSize : 72822163
InstallSize  : 496836410
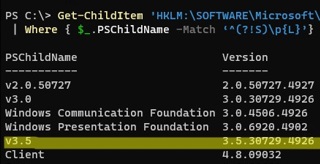
List the versions of the .NET Framework that are installed on your computer:
Get-ChildItem 'HKLM:\SOFTWARE\Microsoft\NET Framework Setup\NDP' -Recurse | Get-ItemProperty -Name version -EA 0 | Where { $_.PSChildName -Match ‘^(?!S)\p{L}’} | Select PSChildName, version
How to Install .NET Framework 3.5 on Windows Server 2022/2019/2016?
On Windows Server 2022, 2019, 2016, and 2012 R2, you can install NET Framework 3.5 in several ways:
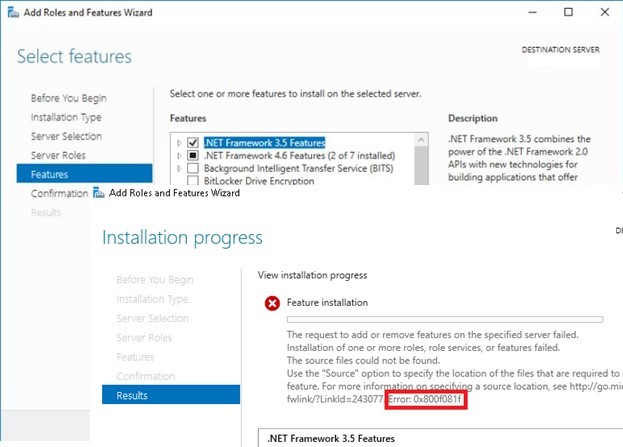
- Via Server Manager: Add roles and features -> Features -> .NET Framework 3.5 Features -> .NET Framework 3.5 (includes .NET 2.0 and 3.0 );
- Using DISM:
DISM /Online /Enable-Feature /FeatureName:NetFx3 /All - With PowerShell:
Install-WindowsFeature NET-Framework-Core
In this case, all the necessary .NET 3.5 installation files for your Windows Server version will be downloaded from the Windows Update servers. For this installation method to work, you need to check the following:
- Your Windows Server must have direct Internet access. Proxy and firewall settings should not restrict access to Windows Update servers;
- Your host must not be configured to receive updates from the local WSUS server. Check your current Windows Update settings using the Group Policy result report (
rsop.msc) or directly in the registry; UseWUServer parameter in the registry:
Get-ItemProperty -Path "HKLM:\SOFTWARE\Policies\Microsoft\Windows\WindowsUpdate\AU" -Name "UseWUServer" | select -ExpandProperty UseWUServer
If the parameter value is1, then your host is configured to receive Windows updates from the local WSUS server. In this case, you will receive error 0x800F0954 when installing .NET 3.5. Change the registry parameter to0or remove it to connect directly to the Microsoft Windows Update servers.Check the value of theparameter in the registry:If the parameter value is, then your host is configured to receive Windows updates from the local WSUS server. In this case, you will receive errorwhen installing .NET 3.5. Change the registry parameter toor remove it to connect directly to the Microsoft Windows Update servers.
If you can access the Internet from your Windows Server host, but it is configured to receive updates from WSUS, you will see error 0x800f081f when installing NET Framework.
Solution: Install .Net 3.5 online from Microsoft servers and ignore local WSUS:
- Export the current Windows Update settings from the HKLM\Software\Policies\Microsoft\Windows\WindowsUpdate registry key to a REG file:
reg export HKLM\Software\Policies\Microsoft\Windows\WindowsUpdate c:\WindowsUpdateRegFile.reg - Delete this key (
Remove-Item -Path HKLM:\Software\Policies\Microsoft\Windows\WindowsUpdate -Recurse) and restart the service:net stop wuauserv & net start wuauserv - Run the .Net 3.5 installation from the web:
DISM /Online /Enable-Feature /FeatureName:NetFx3 /All - After the installation is complete, return the previous WU settings: import the reg file (
Reg import c:\WindowsUpdateRegFile.reg) and restart the Windows Update service again
If there is no direct Internet access from the server, then when you try to install .NET 3.5 on Windows Server through the Server Manager, you will receive the error 0x800F081F (The source files could not be found), 0x800F0950, 0x8024402c, 0x800F0906, or 0x800F0907 (depending on the version of Windows Server).
Although .NET Framework 3.5 is listed as a feature of Windows Server 2022/2019/2016/2012R2, its binary files are missing from the Windows component store (Features on Demand concept). This is done to reduce the size of the operating system image on the disk. You can check if the .NET Framework 3.5 source files are available in the local component store of Windows Server with the command:
Get-WindowsFeature *Framework*

As you can see the status of the NET-Framework-Core feature is Removed.
In order to install the NET-Framework-Core, you will need a distribution with your version of Windows Server in the form of an ISO file, or in the extracted form in a network folder. Mount the ISO file with the Windows Server install image as a virtual drive (for example, drive D:). Now, you can install the Windows features from the GUI or using PowerShell.
You can install the .Net 3.5 feature from the Server Manager graphical console:
- Select the .Net Framework 3.5 feature as earlier, but prior to clicking Install, click a small link Specify an alternate source path at the bottom of the form;
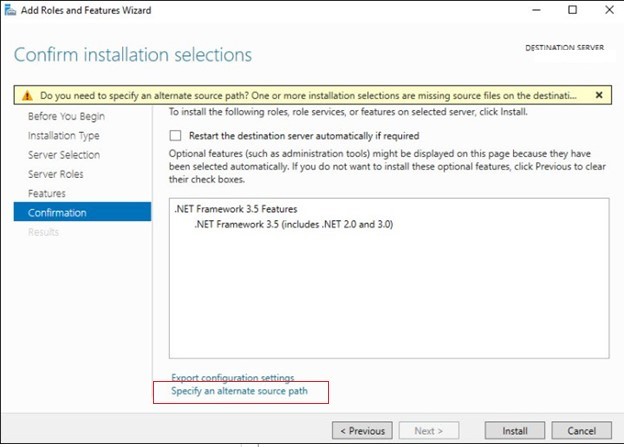
- Specify the path to the Component Store (SXS) folder in your Windows Server distro. If you mounted the ISO image as a virtual disk, the path may look like
D:\sources\sxs. It can also be a network share, where you copied the distribution files (for example,\\fs1\iso\ws2016\sources\sxs). Then click OK.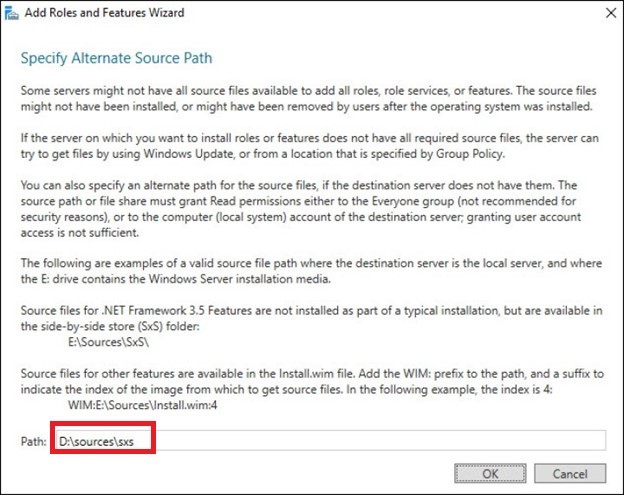
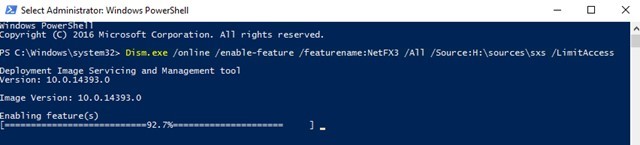
It is much easier to install .NET Framework 3.5 feature from the elevated command prompt or PowerShell console. Just run the command:
Dism.exe /online /enable-feature /featurename:NetFX3 /All /Source:D:\sources\sxs /LimitAccess
D:\ is the drive with Windows Server source files.
Whereis the drive with Windows Server source files.
The LimitAccess parameter prevents DISM from connecting to Windows Update servers to receive feature binary files. Only source files in the specified folder are used.
If you want to install the Windows Server feature using PowerShell, use the Add-WindowsFeature command:
Add-WindowsFeature NET-Framework-Core -Source d:\sources\sxs
After the component installation is completed, a server restart is not required.
You can also manually copy 2 CAB files microsoft-windows-netfx3... from the \sources\sxs folder of your Windows Server install image. In this case, to install .NET 3.5, just run the command:
dism /online /Add-Package /PackagePath:C:\distrib\net35\microsoft-windows-netfx3-ondemand-package~31bf3856ad364e35~amd64~~.cab.
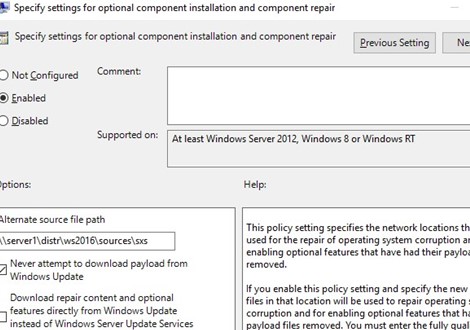
Configure .Net Framework Offline Installation Options with GPO
You can configure specific settings for installing Windows components from a local source or Windows Update even when using WSUS with the Group Policy option Specify settings for optional component installation and component repair (located under GPO section Computer Configuration -> Administrative Templates -> System).
gpedit.msc). In an Active Directory environment, you can create a GPO for all computers/servers using the gpmc.msc).
On a standalone computer, you can enable this policy setting using the Local Group Policy Editor ). In an Active Directory environment, you can create a GPO for all computers/servers using the GPMC console ).
Here you can specify that when installing or repairing Windows components, you should always download files from the Windows Update servers (Internet) instead of the local WSUS server (the “Download repair content and optional features directly from Windows Update instead of Windows Server Update Services” option).
You can also specify the path to the shared folder with Windows Server components that you want to use for offline installation in the “Alternate source file path” parameter:
- Specify the path to network shared folder in the UNC format (
\\fs01\distr\ws22\sxs) (here you can specify multiple UNC paths separated by semicolons:\\fs01\ws22\sxs;\\man02\ws22\sxs;\\fs03\sxs) - It is also possible to specify a WIM file as a source:
WIM:\\fso1\distr\ws16\install.wim:2(in this case,2is the index of your edition of Windows Server’s image in the WIM file. You can list available Windows Server edition in a WIM file with a command:DISM /Get-WimInfo /WimFile:"\\server\distr\ws2016\install.wim")
Use the different SXS sources for different versions of Windows Server. If you are running multiple versions of Windows Server on your network, you will need to create separate GPOs with different UNC paths to SXS sources. You can use Group Policy WMI filters to apply a GPO only to hosts that are running specific versions of Windows Server.


