Client Authentication Certificate 101: How to Simplify Access Using PKI Authentication


 (No Ratings Yet)
(No Ratings Yet)
![]() Loading…
Loading…
Loading…
Mục lục bài viết
Client Authentication Certificate 101: How to Simplify Access Using PKI Authentication
Password security is lacking in most businesses. 57% of users write their passwords on “sticky notes,” and 67% admit to losing those notes, 2021 data from Keeper Security shows. Using certificate-based authentication makes your business more secure while providing a better user experience. Here’s how PKI authentication works & what IT admins need to know to implement it within their organizations
Password-based security in many organizations is a problem. Sure, part of this stems from employees practicing poor password hygiene (such as creating weak passwords or sharing their credentials with colleagues). However, a large part of it comes from employers practicing poor access management. Recent data from Keeper Security and Pollfish shows that 32% of their 1,000 survey respondents say they’ve accessed accounts belonging to their former employers. So, how do you mitigate these password-related vulnerabilities? By eliminating passwords altogether through the use of client authentication certificates.
Client certificate authentication, or more accurately certificate-based authentication, is an easy way for users to access resources and data securely. Unlike traditional password-based security methods, which consist of typing in usernames and passwords every time you want to access something, this way of proving your identity doesn’t require multiple login attempts or the (inevitable) dreaded password reset option. It also doesn’t need you to type in any annoying one-time passwords (OTPs), PINs, or other prompts.
Instead, this method of authentication relies on PKI cryptographic technologies and processes to make authentication a breeze. Using a client authentication certificate means that users can authenticate on the backend without dealing with insecure or hard-to-remember passwords.
But what is certificate authentication and how does it work? How is using a client authentication certificate more secure than using traditional password-based authentication and some multi-factor authentication (MFA) methods? And how do you implement PKI authentication within your IT environment using these certificates?
Let’s hash it out.
What Is Client Certificate Authentication? PKI Authentication Explained
 A graphic representing that remembering a bunch of passwords isn’t necessary when you implement PKI-based client authentication.
Certificate-based authentication allows users to log in to various systems without typing in a traditional username and password. Instead, the user’s browser (i.e., their client) automatically logs them in using a digital certificate (and a PKI key pair — more on that later) that’s saved on their individual computer or device.
This method of authentication allows authorized users to access everything from specific files and services to your network and other IT systems. To put it another way, client authentication:
- Doesn’t require the use of confusing or hard-to-remember passwords.
- Provides a better user experience for users and simplified account access for your IT admin.
- Eliminates credential-phishing vulnerabilities that could otherwise snare your employees.
- Mitigates the password security risks that cybercriminals love to exploit in brute force and rainbow table attacks.
- Is more secure than token- and SMS-based MFA methods alone when you use a client authentication certificate in conjunction with a trusted platform module (TPM).
- Doesn’t require additional hardware (although it’s most secure when you use it in conjunction with a TPM — which comes equipped with most Windows 10 devices).
Authentication Over the Internet Requires Verifiable Identity
Authentication, at its core, is about verifying that someone or something (in the case of devices) is who or what they claim to be. So, when we talk about certificate-based authentication, or what’s also known as PKI authentication over the internet, what we’re really discussing here is the use of X.509 digital certificates and public key infrastructure to identify individuals and their devices remotely in public channels.
This is where client authentication certificates fit into the picture. In a nutshell, these digital files make user authentication and machine-to-machine communication more secure. It’s also a way to restrict access to systems to only authenticated users or devices.
User authentication is critical to access management and developing a zero-trust security architecture for your business. After all, you don’t want random employees accessing your servers, networks, web apps, or other digital resources willy-nilly, right? This means you always need to be sure that users who request access to protected sites or resources are legitimate before giving them access. PKI certificate-based authentication is a way to do this without using traditional password-based login methods.
Because certificate-based authentication doesn’t require users to enter their password again once they’ve logged into their device, this user authentication method is considered a type of passwordless authentication. Essentially, it ties an individual user’s digital identity (their machine identity or identifying digital attributes) to a special file — the digital certificate we mentioned earlier. But just what are digital certificates?
Digital Certificates Are Your Digital ID Card on the Internet
 A fake employee ID card graphic that represents a physical or tangible means of employee authentication.
Digital certificates are files that serve as your ID card in the digital world. Much like how your government-issued driver’s license or ID card identifies you in an official capacity, these certificates do the same for you on the internet. And much like how your driver’s license has a unique letter-number combo that represents you, every digital certificate has unique characteristics that differentiate it from others.
These certificates are the essential and trusted elements of public key infrastructure (PKI — which we’ll talk more about later). They’re trusted because they require a reputable and publicly trusted third party (known as a certification authority, certificate authority, or simply a “CA”) to verify your identity prior to issuing the certificate.
Public CAs Are Like the DMV…
We’re not going to go over everything CAs do, but we’ll give you a quick overview so we can keep this topic rolling. (Check out the link embedded in the paragraph above for a more in-depth look at what CAs are and how they work.)
A public CA is like the PKI digital identity equivalent of your local Department of Motor Vehicles office. Much like how a DMV official checks out your application and makes sure your individual identity is real before issuing you an ID card, a CA reviews your certificate signing request (CSR) for new digital certificates. They take the paperwork and documentation you provide and check it against various official resources to ensure they’re legitimate. (CAs are all about crossing those Ts and dotting those Is.) Once they verify that everything matches up (i.e., that you’re really you), they issue your client authentication certificate.
Of course, some companies opt to use local (private) CAs to issue their own client authentication certificates. The certificate issuance for private certificates is different because the process doesn’t require a publicly trusted CA to verify information first. As a result, these certificates aren’t publicly trusted. This means that private client authentication certificates should only be used to secure access to internal-facing resources — never external (public-facing) ones.
Client Authentication Certificates Have Many Names…
Okay, this is where things can get a bit confusing for those who aren’t IT admins or who don’t interact with PKI systems regularly. Remember earlier when we said that client authentication certificates and PKI authentication certificates are the same? Well, they are, but they also go by a few other names as well.**
- User identity certificates.
- Device certificates.
- Mutual authentication certificate.
- Two-way authentication certificate.
- Email signing certificates, Email authentication certificates, and S/MIME certificates.
(** There’s a lot of overlap between these different certificates, but depending on the situation, they’re not always identical. For example, some S/MIME certificates can be used for client authentication while others cannot. And some IoT device certificates are typically issued by private CAs, meaning that public CAs can’t validate them.)
Why so many (seemingly unrelated) names? In some cases, it’s because people have many different ways of saying the same thing. In others, it’s because these certificates wear a lot of hats (i.e., they serve multiple functions). For example, the same PKI digital certificate that you install on your device to authenticate your computer to a web server might be the same certificate that you can use to sign and encrypt your emails.
Now, of course, this cross-use capability isn’t the case for all X.509 digital certificates. For example, you can’t use a website security certificate to authenticate a user because that’s used to authenticate web servers to users’ clients (browsers) and create encrypted connections. You also can’t use a document signing certificate to sign a piece of software for the same reason — they’re different X.509 certificates that were created for different purposes. (Although, it’s also important to note that some PKI authentication certificates have the cross-functionality to sign some types of documents.)
This is where a PKI authentication certificate is rather unique. Unlike the other types of PKI certificates, a PKI authentication certificate can sometimes be used for a variety of different purposes — one of which is mutual authentication. And that’s the purpose that we’ll focus on in this article.
Why Certificate-Based Authentication Matters
Scaling your network securely and setting up remote access for a bunch of employees can be tricky and time-consuming under normal circumstances. The onset of the COVID-19 global pandemic last spring, which forced businesses to close their offices and millions of employees to work from home remotely, made this even more of a critical issue for IT admins across the globe. And even now, a year later, businesses are still trying to roll out better and more secure user access methods.
And considering how often employees don’t follow password safety best practices, you sometimes need to take the initiative to shore up your defenses through other means. Of course, opting to use a client authentication certificate may not be a good fit for all situations. But it can come in handy in many circumstances — particularly for larger organizations.
Setting up certificate-based authentication requires a little more time to set up, but it saves time in the long run and is significantly more secure. When you put PKI authentication certificates to work, you:
- Simplify the authentication process. By no longer requiring users to remember usernames and passwords, you make it easier for your authorized users to access privileged sites or services. An added bonus is that you reduce employee frustration and IT support time!
- Block sloppy password practices. Certificate-based authentication makes it impossible for users to share account logins, and they’ll no longer have a reason to leave sticky notes with passwords on them lying around.
- Make your organization immune to brute force and other password-related attacks. If your users don’t have passwords, then there’s nothing for cybercriminals to brute force. Because certificate-based authentication uses a 2048-bit key pair, it’s too impractical for even a modern supercomputer to break it.
- Improve your organization’s cyber security defenses. By eliminating the need for passwords that can be phished, stolen, intercepted, shared or otherwise compromised, you’re essentially making your business practically “phishing proof.”
- Implement better access controls. Restricting access to only the users and devices that actually require it reduces your organization’s risk of exposure.
- Can easily revoke complete access for individual users. When an employee leaves your company, you can simply revoke their certificate to disable all access associated with their account.
- Move your organization toward a zero-trust infrastructure. By trusting no one automatically and requiring users to authenticate using certificates instead of passwords, you’re another step closer to achieving a zero-trust environment.
It’s a win-win for everyone — except, of course, for the cybercriminals who want to exploit your security weaknesses. But who cares what they want? No one who matters to your business.
Remember the Keeper Security data we mentioned earlier regarding nearly one-third of employees who can still access their accounts after leaving their former employer? Yeah, this stops that kind of thing from happening. Of course, it’s not the only way to do it. But it’s still great to have as an option.
How Client Authentication Works
Let’s first consider how certificate authentication works from a high-level perspective. We’ll provide a simple overview first. After that, we can go more in-depth for those who want to learn more about the technical process.
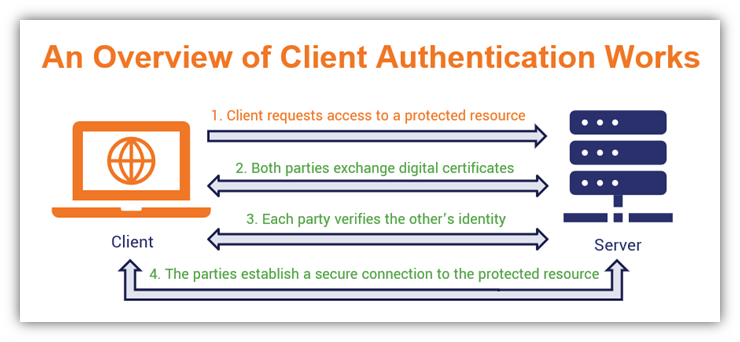 This basic graphic provides a quick overview of how client authentication works using a client authentication certificate.
- A user attempts to log in to a web app or service using their digital certificate. Rather than logging in using a username and password, they rely on a digital certificate that’s installed on their device. This allows them to login automatically without having to remember credentials.
- The server and the user’s client take turns exchanging digital certificates. The digital certificate provides identifying information about both parties. Client authentication certificates from public CAs traditionally identifies you based on your email address. But if the certificate is issued by a private CA, it may use other information such as an arbitrary string of numbers, a username, or an ID number.
- Both parties verify the other as the legitimate certificate owner. This is done by verifying that each party has the private key that matches their individual certificate’s public key. If they key matches, they’d good. If it doesn’t, the connection gets rejected immediately.
- Once verified, the server and client establish a connection to the secure resource. The server and client work out some technical details and establish a secure, encrypted connection. Done.
Okay, so now that we know what client authentication certificate is and why it’s useful, it’s time to take a look at how certificate-based authentication actually works in a more technical sense.
To do this, let’s first consider how traditional website authentication works. The reason I say that is because client authentication works along the same lines. However, instead of just the user’s client authenticating the web server it’s connecting to, client authentication involves your client authenticating itself to the web server. This process is also known as mutual authentication or two-way authentication.
Certificate Authentication Relies on PKI Certificates and Cryptographic Key Pairs
The reason why certificate authentication works is because it’s not a stand-alone thing. As I mentioned earlier, it relies on public key infrastructure, which is the foundation of internet security as we know it. Although we’re not going to go into all of the technical mumbo-jumbo of what PKI is and how PKI works here, we’ll at least give you a quick overview before going into specifics about how authentication works in general. This will help you better understand the client authentication process more clearly.
Public key infrastructure is the conglomeration of cryptographic technologies (including digital certificates and public-private key pairs), processes and policies that enable you to send sensitive information security across the internet. It’s what makes that nifty padlock appear in your web browser and the information your organization stores on its databases secure. In short, PKI is the framework that makes secure communications over the internet possible.
So, to get a clearer understanding of how client authentication works, we’ll first talk about how the traditional website authentication process works. Then we can dive in to discussing PKI authentication using client authentication certificates after that.
Understanding How Authentication Works Through Traditional Server Authentication
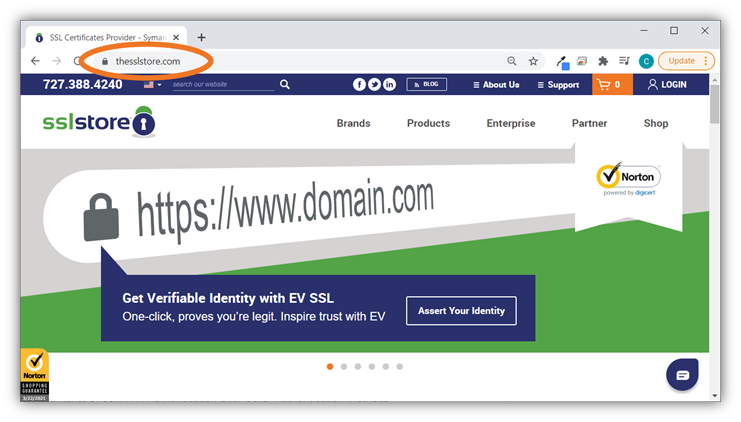 A screenshot of TheSSLstore.com’s home page with the padlock security icon circled, which shows that the website is delivered via a secure, encrypted connection.
Do you like signing up for subscription services without someone intercepting your data? Do you enjoy knowing that your credit card information secure whenever you make an Amazon purchase? If your answer is yes to either of these questions, then you can thank PKI for that.
When your browser (client) connected to a company’s website, the server and your client engaged in a process known as an SSL/TLS handshake. Simply put, this handshake is a conversation between the two parties that allows them to exchange specific types of information. (This info enables them to establish a secure, encrypted communication channel that no unintended parties can intercept.)
There are two types of TLS handshakes currently in use: TLS 1.2 and TLS 1.3. There are technical differences between the two types of handshakes. To learn more about the SSL/TLS handshake, click on the link in the previous paragraph.
From a high-level perspective, here’s a simplified overview of what this conversation includes:
- Your client reaches out to the server and the endpoints exchange information. This request is how your client starts the conversation with the server. They exchange information relating to their cryptographic capabilities and other information they can use to establish a secure, encrypted connection for the session eventually.
- The server gives your client its SSL/TLS certificate and public key to verify its identity. The certificate, which contains CA-verified information about the domain (and the organization that owns it for certificates that have business validation), is a way for the server to authenticate itself. When your client receives a server certificate as part of the handshake process, it runs a bunch of cryptographic checks on the file to ensure its authentic and was legitimately issued by the CA it’s attributed to. If the information checks out, the two entities move on to the next part of the TLS handshake process.
- The server and your browser exchange data that they can use to create session keys. The goal is here to for each party to contribute encrypted data that they will use separately to generate matching symmetric session keys. Both entities communicate throughout the process to let the other know once the session key is ready to use.
- Both parties switch to using an encrypted channel. This part of the TLS handshake involves the client and server changing from the cipher they’ve been using to a new one that they’ve agreed upon that will use the newly generated key. The client will switch first, followed by the server. After this point, they’ll communicate using the authenticated and encrypted connection.
This process relies on asymmetric encryption initially because it’s the most secure way to exchange information in public channels. However, public key encryption is considered a bit “slow” in terms of overhead because it requires the use of two unique but related keys. Once the client authenticates the server and the two entities come to an agreement regarding the session key, they can switch to using symmetric encryption (which only uses one key). This method of encryption is more efficient for at-scale data encryption and decryption.
Needless to say, PKI is essential to website security because you can’t have the latter without the former. For example, whenever you visit a secure website, you’ll see the padlock icon in the web browser (as shown in the graphic below). If you click on the web address to expand it, you’d also notice it says “HTTPS” at the beginning of the URL. This means that the server is serving you the website using the secure HTTPS protocol.
So now that you understand how website authentication works, where does client authentication fit into the picture?
A Client Authentication Certificate Provides Mutual Authentication During the Handshake
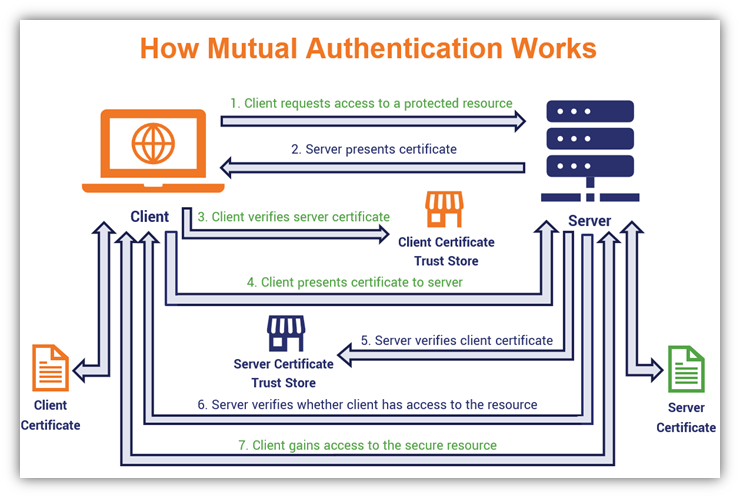 This diagram breaks down the role a client authentication certificate plays in making mutual authentication possible between a website’s server and a user’s client.
In much the same way as how a website’s server authenticates itself to your client during the TLS handshake, your client can also authenticate itself to a server. This is known as mutual authentication or two-way authentication because both devices authenticate themselves instead of the usual one-way authentication. It’s kind of like the server authentication process, but it’s authenticating the client to the server instead of vice versa.
So, how does PKI client authentication work?
- Your device initiates an HTTPS connection. This starts the process of trying to gain access to a protected resource (such as a service or an internal website).
- The server and your device exchange PKI certificates. Just like in a traditional TLS handshake, the site or service sends your client a copy of its own SSL/TLS certificate. But this time, it will also request a copy of your device’s client authentication certificate and public key to verify its identity.
- Your client ensures the server certificate is valid and legitimate. To verify the certificate’s validity, the client traces the SSL/TLS certificate back to the original issuing root certificate via the trust store. If it matches, it can proceed. If not, it will terminate the connection immediately.
- Your client sends its client authentication certificate to the web server. This is where the client authentication part of the SSL/TLS handshake occurs. This enables mutual authentication between the server and client.
- The server verifies the certificate is legitimate and valid. Can’t be too careful, right? Verifying the client authentication certificate’s legitimacy requires checking the certificate’s information as well as the intermediate(s) and root it chains back to. The goal is to ensure that:
- The certificate is valid (i.e., that it hasn’t expired or been revoked),
- It shows as being recorded in CT logs (meaning it was logged properly after being issued), and that
- The certificate is trusted (that it contains a digital signature and was signed by a cryptographic public key that can be traced back to the issuing CA).
- The server verifies the user has authorization to access the requested resource. This is where associating a certificate with a user’s individual identity is important. The server will check ensure the user or device has permissions or authorization to access the resource they’re asking for. If the profile doesn’t have permissions for that resource associated with it, the server will refuse the connection.
- The server will allow or reject access to the resource depending on the results of the authentication process. Once your device and the server or service you’re connecting authenticate each other successfully, they’ll establish a secure, encrypted connection. This means you can access the website or service securely without fear that someone will intercept your connection and data. But if the server or service can’t verify your device’s identity successfully, or if your digital identity doesn’t have the necessary permission to access that specific resource, the server will end the connection request faster than you can say “nope.”
Of course, there is one very important thing we need to note: The security of certificate-based authentication relies on users keeping their private keys and physical devices secure. For example, suppose your coworker Bob always leaves his computer unlocked in the middle of the office whenever he goes to lunch. In that case, Bob’s leaving his authentication credentials vulnerable to access and use by unauthorized users.
Not securing your device — either with a strong password or another factor (such as a biometric) — is like leaving your ID card sitting on your desk when you go to the restroom. You just don’t do it.
How to Enable PKI Authentication Using Client Authentication Certificates: A Guide for IT Admins
Want to put certificate authentication to use within your own business? Great. We can help you do that. Of course, you can do this process manually or you can carry it out automatically through the use of a remote certificate management tool.
But how do you actually go from A to Z in terms of enabling PKI client authentication within your organization? We’re going to break it all down.
Let’s get this party started.
1. Purchase and Generate a Client Authentication Certificate
This is always the first step in the process. Once you’ve decided which employees to get certificates for (e.g., those employees who are authorized to have access to your protected data, network, IT systems, devices, or tools), you’ll want to purchase your certificate.
After that, you’ll want to submit a certificate signing request (CSR). You can do generate a CSR via your web hosting control panel or web hosting platforms. (If you buy on TheSSLstore.com, you also can generate your certificate right in your user dashboard.) This process results in the creation of your client authentication certificate and the cryptographic key pair (public and private keys) that comes with it.
2. Complete the Validation Process
After you generate the CSR, you’ll want to submit it to your certificate authority of choice and then complete their validation process. The length of time required to complete validation depends on the type of certificate you request.
The three types of validation for client authentication certificates include:
- Basic,
- Pro, and
- Enterprise.
These validation levels, from first to last, are kind of like domain validation (DV), organization validation (OV) and extended validation (EV) for SSL/TLS certificates in the sense that each level has increasing validation requirements.
3. Download or Export the User’s Client Certificate
Once the CA approves and issues your certificate, you’ll next want to download it onto the device of the user it’s meant to identify. You should receive a link to the p.12 file via email. Just save it to your desktop for quick access. Otherwise, you may have to export it directly from your cPanel.
Here are some directions that you might find helpful: How to Download & Export Your Email Signing Certificates Using Internet Explorer
But, wait, the directions in the list above say they’re for downloading email signing certificates. No, that’s not a trick: the process of downloading and exporting is pretty much the same across the board for X.509 digital certificates. And it’s easy to do in IE since the browser still supports keygen functionality (Firefox used to but they eliminated that functionality a while ago).
4. Import the Client Authentication Certificate to Your OS & Browser Certificate Stores
For an employee to use a PKI authentication certificate, the certificate first needs to be made accessible to your device and its browsers. You can do this by importing the certificate to the device’s certificate store (this is the trust store for Windows users or Keychain for Apple users) and your individual browsers.
The directions for how to import a client authentication certificate this will differ a bit depending on the browser you choose to use, too. But no worries, I’ve put together some step-by-step directions for you for the two most popular browsers.
How to Import a PKI Client Authentication Certificate in Google Chrome
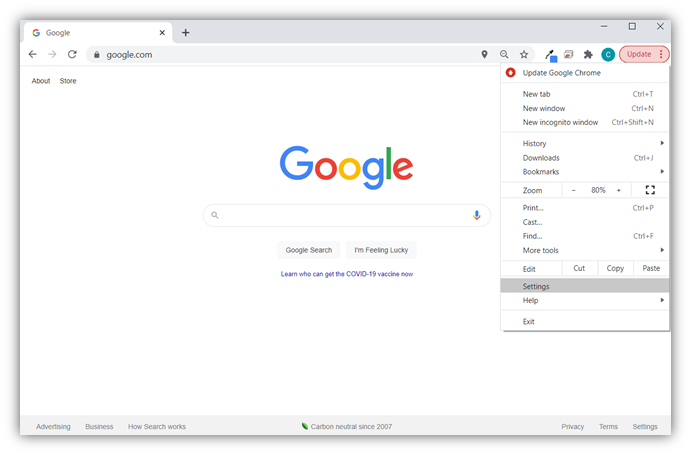
- What you’ll want to do first is select Settings from the Google Chrome settings menu. (This is the three dots that display in the upper-right hand corner of your browser window.)
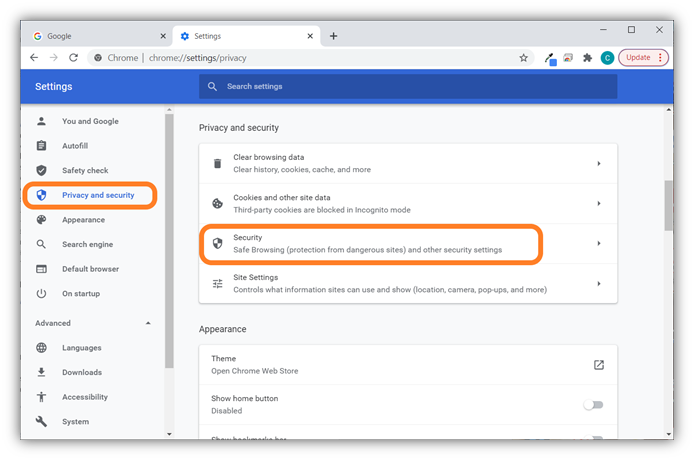
- In the window that pops up, select Privacy and Security in the left-hand navigation menu. This will bring up a list of four options in the main window. There, you’ll want to select Security.
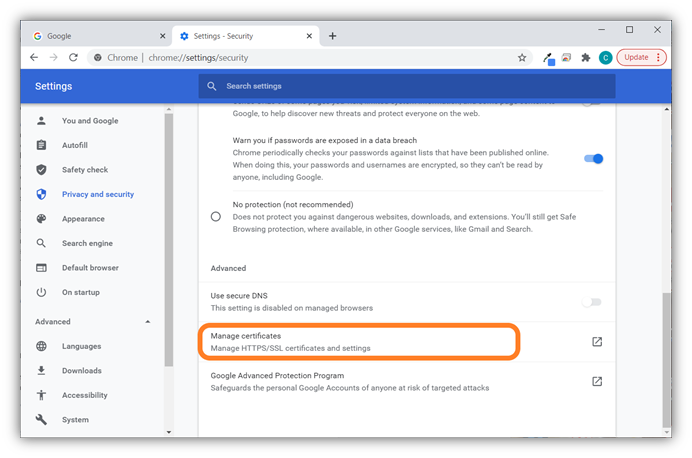
- In the Security window that results, scroll down to the Advanced section and select the Manage certificates option as shown below.
- A separate window will pop up labeled Certificates and you should be placed in the People tab automatically. (If not, select the People tab from the top navigation menu.) This is where any installed certificates you have will display. To move to the next step, select Import — this will launch the browser’s user-friendly Certificate Import Wizard.
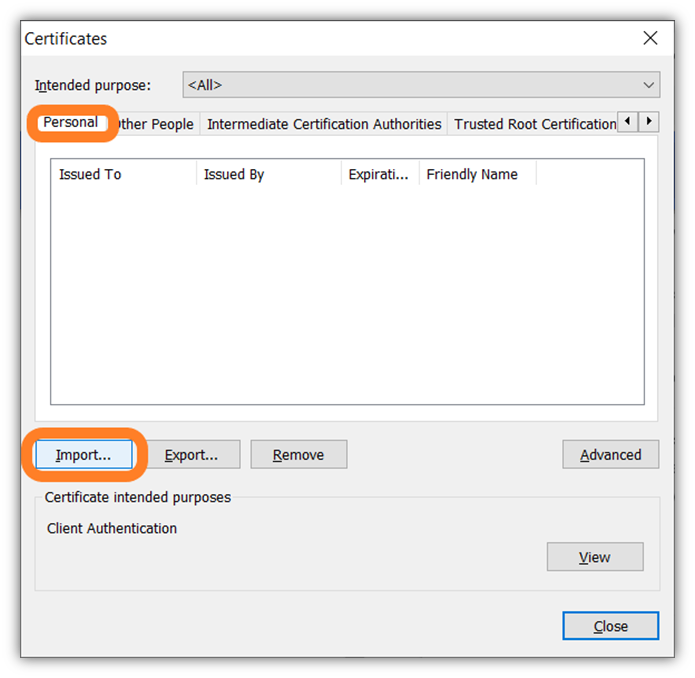
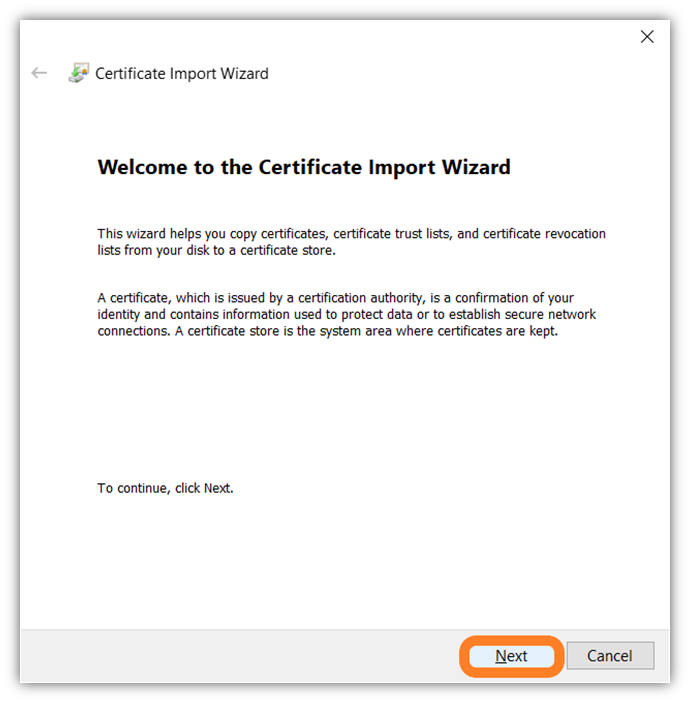
- In the Certificate Import Wizard, press Next to continue.
- To select the specific certificate file to upload, select the Browse button and navigate to where you have the certificate file saved on your desktop.
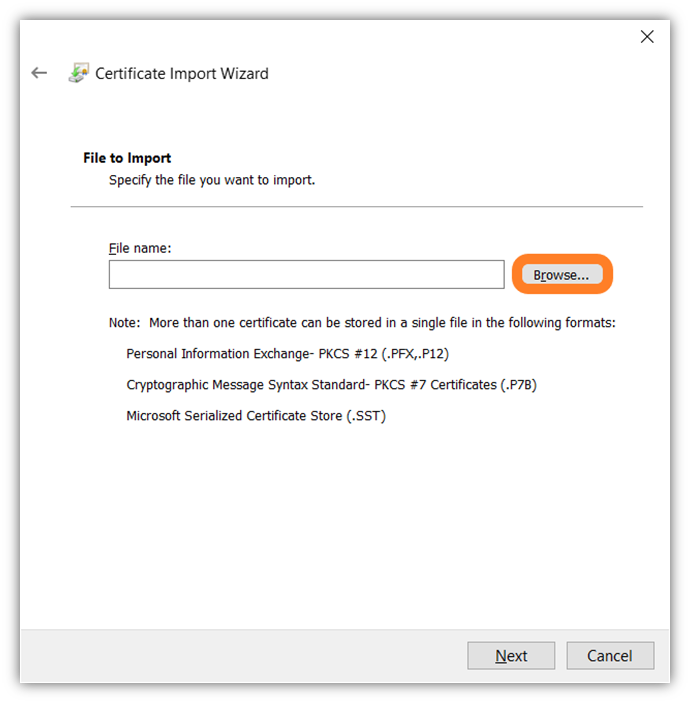
- To find the specific .pfx file more quickly (if you have a messy desktop like me), you can narrow down the browsing feature by extension type — in this case, you’ll want to select Personal Information Exchange (*.pfx, *.p12) to show only those types of files. Once you’ve selected the file, press the Okay button. (This will return you to the previous window but will have that file selected.)
- In the open window, press Next to keep the process moving.
- Here, you’ll be asked to enter your private key password. This is the password you created during the certificate exportation process (i.e., when you downloaded the .pfx certificate file). After you enter that secret, you’ll must check the following options: Mark this key as exportable and Include all extended properties. When finished selecting these import options, press Next.
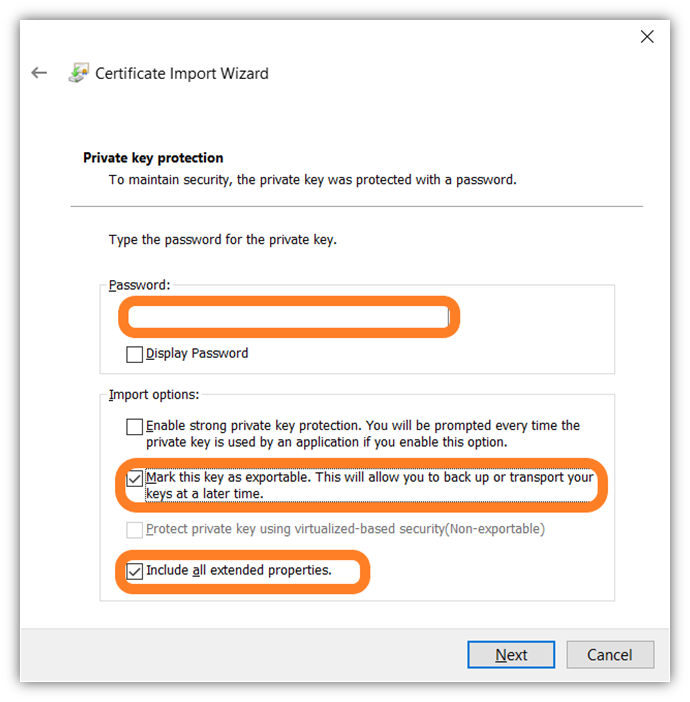
- This will complete the Certificate Import Wizard process. Boom! Of course, you’ll want to review and double-check your settings. If everything checks out, select Finish. If successful, you should receive a message indicating as much — just press Ok. If not, then you’ll want to retry the process.
How to Import a PKI Client Authentication Certificate in Mozilla Firefox
Okay, now we’re going to walk you through virtually the same process, but the following steps break down the process in Firefox instead.
- In Firefox, open the browser menu by clicking the stacked lines in the upper right-hand corner of your browser. From the menu that pops up, choose Options to bring up a new window.

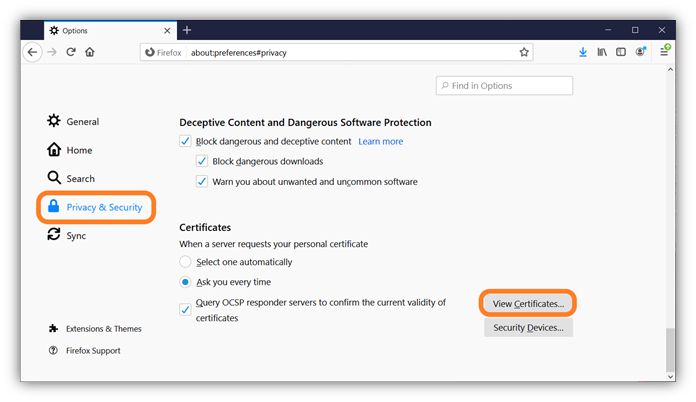
- In the Preferences window that appears, select Privacy & Security from the navigation on the left. After that, scroll until you reach the Certificates section at the bottom of the screen. Double-check that the Ask you every time option is selected and then press the View Certificates button.
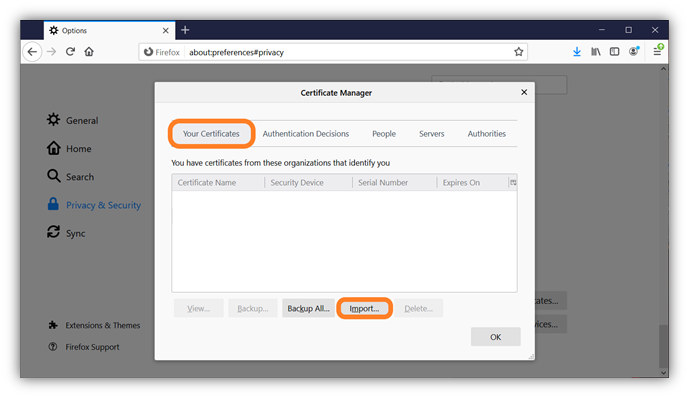
- A new Certificate Manager window should pop up and should place in the Your Certificates tab automatically. (If it doesn’t, just click on the tab yourself.) This window is where any client authentication certificates or other PKI certificates that you have installed in your browser will display. Once there, press Import to bring up a new window.
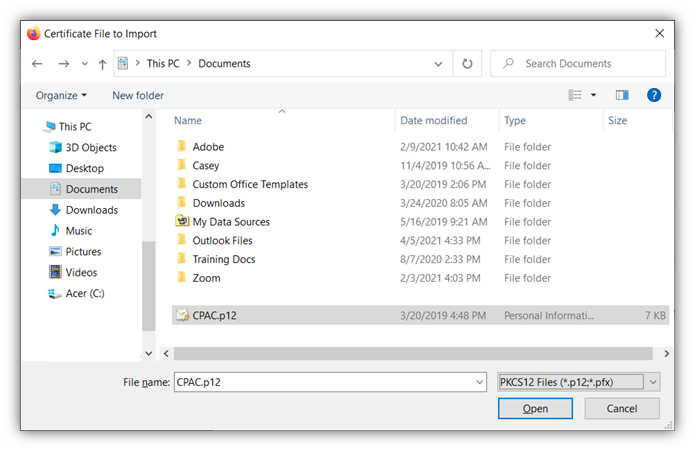
- In the Certificate File to Import window, choose the file you wish to upload. If you aren’t seeing the file you need, make sure that you have PKCS12 Files (*.p12,*.pfx) selected in the file extension drop down menu (to the right of the file name field) and it should display. Afterward, press Open.
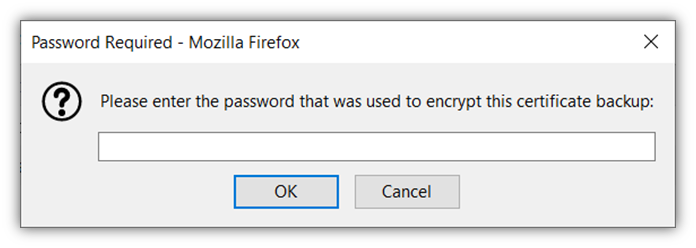
- A new password entry prompt window will pop up. This is where you’ll enter the password you created earlier (when you originally exported or downloaded your certificate and private key). Press Okay to complete the process.
Once you’ve successfully completed the import process, you should receive a message telling you that your certificate imported successfully. Now, you’re nearly to the point of allowing that authorized user to access your secure resources. But first, there’s something else you have to take care of on the back end to make that happen…
5. Configure Your Server to Support Client Authentication
Taking this step makes it so that when a user’s client authentication certificate gets presented to your server, it’ll enable them to authenticate automatically. (Note: the process isn’t done yet. There are still a few more steps you’ll have to complete before this will happen.)
Of course, the specifics of how you go about doing this depends on the type of server(s) your organization uses. For example, the directions for configuring a specific NGINX server will differ from those you’d use to do the same on an Apache server.
We’ve put together a few quick resources that you may find helpful:
6. Test Your Certificate to Ensure It Works
Accidents happen and things sometimes go wrong. This is why you have to make sure your PKI client authentication certificate installed properly and without issue. To verify this, you’ll want to type in the URL of the resource that the user will access using the device that has the certificate installed. If the site displays your user account information, it means that the certificate was installed correctly and you can go about your day.
If you want to practice (or just see how the process works), you can download a test client certificate from badssl.com to install on your browser. Once the client authentication certificate is installed, you can test it using badssl.com’s client. When you’ve installed it properly, you’ll receive an OK message. If not, you’ll get a not-so-fun 400 error.
Related: Secure Your Website with a Comodo SSL Certificate.
7. Add the User Permissions to Your Server’s Access Control Lists (ACLs).
Okay, you’ve got your certificates set up, servers configured, and you have everything ready to go. Right? Not quite. You still need to set permissions for authorized users’ accounts. Access control lists, or ACLs, are a great way to restrict access to specific files, sites or services so that they can be accessed only by your approved list of users. In this case, you may want to set up URL ACLs for your internal websites and other resources you wish to protect.
Best Practices for Managing Certificate Authentication
Before we wrap up this article, there’s one more important thing to mention. Properly managing the processes and technologies that make certificate authentication possible within your organization is important and isn’t something we should skip.
But don’t worry — I promise to keep this brief. Scout’s honor. Here are a few quick client authentication management tips:
- Set up a Certificate Management Operations Policy. This sheet is your quick, go-to resource for everything relating to your internal management of certificates. This document should outline how and who manages certificates within your organization, which CAs you should use, and which individuals have what permissions (as well as other related topics).
- Keep your private keys secure. This is critical considering how essential and sensitive these keys are. A great method of storing your keys securely is by using a TPM or HSM. Never store them on public-facing servers.
- Set up certificate revocation processes. Things can go wrong in area of technology and IT security, and certificates are no different. This is why properly managing the certificate lifecycle is critical. When certificates occasionally get revoked by a CA, you need to have the processes in place to ensure that the revocations are taken care of quickly and effectively to manage the impact of their revocation.
- Keep user permissions up to date. Access management, when improperly managed, can spell disaster. If people whose access privileges should have been revoked but weren’t still have access to sensitive systems, then they can do unmitigated damage to your business.
- Use a comprehensive certificate & key management tool. Having the right tools at your disposal is the difference between swimming toward your goal versus treading water. A great certificate manager is one that provides visibility of all the digital certificates and keys that exist within your IT environment. It also provides a centralized platform where you can manage your certificates’ lifecycles. Considering that recent Keyfactor data shows that 53% of surveyed organizations don’t have a clue how many keys or certificates they have, it’s easy to see why such a tool is necessary.
For some other tips relating to certificate management, be sure to check out our Certificate Management Checklist:
Final Thoughts on PKI-Based Client Authentication & Client Authentication Certificates
You can have the best cyber security resources at your disposal. But if one of your employees accidentally clicks on a link in the wrong email or is the target of a social engineering attack, your organization and all of its valuable data are at risk. All it takes is one employee mistake for your organization to make cyber attack or data breach headlines.
Recent headlines show that phishing scams continue to be a growing threat to businesses globally. The FBI’s Internet Crime Complaint Center (IC3) reports that in 2020, Americans filed 791,790 cybercrime complaints with reported losses surpassing $4.1 billion. Of those, 241,342 complaints with adjusted losses of more than $54 million resulted from phishing scams alone. But why is phishing such a big attack vector?
Frankly, it’s because cybercriminals are opportunistic; they often seek out the easiest targets that give them the greatest results for the least amount of effort. (“Work smarter, not harder” as the saying goes.) They know the passwords people often use aren’t secure and that people don’t follow password security best practices.
Cybercriminals also know that relying solely on password-based authentication methods makes your business the “low-hanging fruit” of targets. What I mean by that is that bad guys know that they’ll have to invest less time and fewer resources to attack you than, say, one of your competitors who has good cyber hygiene and whose users practice strong password security.
This is why you need to elevate yourself to those high up, hard-to-reach branches by implementing strong access controls. Using client authentication certificates to limit access to your sensitive resources and data is just one way to eliminate password-related vulnerabilities. Of course, it’s not the only thing you can do. Regardless of how you choose to do it, make sure you implement strong access controls and follow access management best practices. This way, you make your organization as tough a target as possible.


