
Download Latest Samsung Odin for Windows (All Versions) | 2023
Odin for Samsung devices makes it easy to install tar.md5 firmware binary files (BL, AP, CP, CSC, HOME CSC, and PIT) using a Windows PC. You can download the latest Odin 3.14.4 and all older versions of Samsung’s official flash tool for free. To flash a custom system image you can also download the modified or patched Odin. Mac and Linux users can download Heimdall or Java Odin instead.
Samsung Odin is a very lightweight and easy-to-use stock ROM flashing tool for the Samsung Galaxy line of devices including Samsung smartphones and tablet devices. You can simply download Samsung firmware or firmware binaries, select the required fields in Odin and install new firmware or a custom recovery like TWRP (.tar) very easily. Whether you want to update your Samsung device manually, fix a boot loop or install a custom recovery or kernel, Samsung Odin is an essential tool.
What is Samsung Odin Flash Tool?
Simply put, Odin is a stock ROM flash tool that can push firmware binaries with .tar or .tar.md5 extension. If you own an old Galaxy phone or Galaxy Tab, you just need to click the AP field in Odin and click the Start button to initiate the installation.
Since Odin is a portable software, you don’t need to install it on your computer. You just require a Windows PC, download the appropriate Odin Zip file from below, unzip it, and run it as administrator. Please keep in mind that Odin can flash your Samsung Galaxy smartphone or tablet only when it’s booted in the Download Mode or Odin Mode.
Note: Odin is Samsung’s official firmware flash tool and it was developed by the manufacturer only to be used in their service centers. What you find on the Internet are the unofficially distributed versions of the software. Always download the tool from a reliable website.
Download the Latest Odin for Windows
As mentioned above, Samsung Odin is available only for Windows PC and is compatible with Windows XP, Windows 7, Windows 8/8.1, and Windows 10 and 11. In case you are a macOS user or have Linux installed on your computer, you can use Odin’s alternative called Heimdall.
Odin has seen little changes over the years. You’ll hardly notice any change in its interface after Odin3 v3.06. However, after the release of Android Pie-based firmware, Samsung started using LZ4 compression for firmware binaries that can be uncompressed only by Odin v3.13.1, Odin3.13.3, and Odin 3.14.4 (the latest version as of now).
Software Name
Samsung Odin Tool
Latest Version
Odin v3.14.4
Release Year
2022
Supported File Formats
*.bin, *.tar & *tar.md5
Supported OS Versions
Windows 7/8/8.1/10/11
Latest Odin 3.14.4 (2023)
The latest Odin is considered the most versatile version of the tool because it usually supports almost all Samsung devices. However, certain versions of Samsung firmware may require a specific Odin version.
Odin 3.14.4 is the latest version and it is fully compatible with the latest One UI 5.0 (Android 13), 4.1+ (Android 12), and older versions of One UI (Android 9.0 Pie) as well as Android 8.0 Oreo-based Samsung firmware. If you own a Samsung Galaxy S23, Galaxy S22, S21, S20, Galaxy Note 20, Note 10, or any Galaxy device released after 2019, you should use Odin3 v3.14.4.
Before you download Samsung Odin, don’t forget to check out our compatibility list to learn which Odin version you should use.
Odin3 v3.14.4.zip (latest)
Odin3 3.14.1.zip (latest stable version)
Download Modified & Patched Odin
You can use the modified and patched versions of Samsung Odin by Raymond, PrinceComsy, and Realbbb to flash firmware binaries or custom recovery .tar.md5 files in special cases like skipping SHA256 check. If you get the “FAIL! SHA256 is invalid!” error while using the normal version of Odin, you should use the patched Odin to fix the SHA256 error.
Besides, patched Odin can also help you bypass “FAIL! Blocked carrier” and “FAIL! Model mismatch fail” error while installing the firmware on Samsung Galaxy devices from carriers like Verizon, AT&T, T-Mobile, Sprint US Cellular, Rogers, Bell, etc.
Use patched or modified Odin if the developer has specifically recommended using it.
Odin3 3.14.1 3B PatcheD.zip (latest)
Odin3 3.13.3 3B PatcheD.zip
Modded Odin 3.13.1 Raymond.zip
Prince Comsy Modified ODIN.zip
Samsung Odin – All Versions
If you want to download any other version of Odin other than the ones listed above, you can get them below:
Odin3 v3.13.3.zip
If you wish to install an Android 8.0 Oreo or Android 9.0 Pie-based Samsung firmware, use Odin3 v3.13.1.
Odin3 v3.13.1.zip
Odin3 v3.12.7.zip
Odin v312.5, v3.11.2, and v3.10.6 are considered suitable for flashing Android 6.0 Marshmallow and Android 7.0 Nougat-based firmware.
Odin3 v3.12.5.zip
Odin3 v3.12.4_4.zip
Odin3 v3.12.3.zip
Odin3 v3.11.2.zip
Odin3 v3.11.1.zip
Odin3 v3.10.7.zip
Odin3 v3.10.6.zip
Odin3 v3.10.5.zip
Odin3 v3.10.0.zip
To install Android Lollipop and KitKat firmware, you should use Odin3 v3.09.
Odin3 v3.09.zip
Android JellyBean firmware can be flashed using Odin3 3.07 or 3.04.
Odin3 v3.07.zip
Odin3 v3.06.zip
Odin3 v3.04.zip
To flash Android Gingerbread and Ice Cream Sandwich-based Samsung firmware, you should try one of the following versions of the Samsung Odin tool.
Odin3 v2.10.zip
Odin3 v1.87.zip
Odin3 v1.86.zip
Odin3 v1.85.zip
Odin3 v1.84.zip
Odin3 v1.83.zip
Odin3 v1.82.zip
Odin3 v1.70.zip
Odin3 v1.30.zip
Odin Multi Downloader v4.44.zip
Download Java Odin and Heimdall for Mac
Please note that Odin doesn’t support either macOS or Linux officially. However, you can use alternatives like Heimdall and JOdin3 to flash the firmware on Samsung devices.
Similarly, tools like Samfirmand Frija do not support macOS. However, if you want to check for the latest update for your Galaxy device, you can use a cross-platform tool called Samloader on Mac, Linux, and Android to download Samsung firmware directly from Samsung Firmware Update Server.
Heimdall – Odin Alternative for Mac & Linux
Since Odin works only with Windows, Mac, and Linux users can’t use it. Don’t worry, there’s an open-source tool called Heimdall that is compatible with Linux, Mac, and Windows as well. It’s a great Odin alternative and you can download its latest version from the official website.
Heimdall for OSX & Linux
Download JOdin3 for Linux
For Linux users, there’s a special version of Odin called JOdin3 CASUAL that requires Java 8 to be installed on your computer to function. The credit for sharing the latest JOdin3 goes to Toby4213 from the xda forums.
JOdin3CASUAL-Linux-R991.tar.gz | AFH Mirror
Tips: Download jodin.gz file, and extract it to the directory you want: /home/username/programs/jodin/ (for example). Then right-click on the file named JOdin3CASUAL. Make sure you have Java version 8 or greater installed already.
Java-based Odin for Mac (based on Heimdall)
Finally, there’s a Heimdall-based version of Odin that requires Java for Mac to run. Its interface is based on the older version of Odin but you can still use it to flash Samsung firmware on Samsung devices on macOS machines. I am not sure if it still works with the recent versions of OS X because I haven’t tried it personally.
JOdin3CASUAL-0.9.0-osx-incl-JavaFX.zip | Google Drive mirror
To be able to use JOdin3 on Mac, you’ll need Java 11 JDK and Heimdall 1.4.1.
To flash Samsung firmware using Heimdall or JOdin3 on Mac, read my detailed tutorial.
Features of Odin Flash Tool
One of the good things about Samsung devices is the easy availability of stock firmware binaries and an even easier method for flashing them. Using Odin, you can perform a range of actions listed below.
- Install stock firmware binaries manually.
- Update Samsung Galaxy devices with new firmware.
- In many cases, you can also downgrade the software or the build version on your Samsung device.
- You can use Odin to change the CSC (Country Specific [Product] Code) of your Galaxy device to change its localization configuration and get your preferred system language.
- You can fix the boot loop issue on your Samsung device by flashing the stock firmware.
- Install a custom recovery like TWRP to enjoy root privilege and custom ROMs.
- You can also flash modded or patched system images or custom kernels to enhance your device’s performance.
- If your device is not showing the full internal storage capacity (your phone has 512GB of internal storage but it’s showing just 256 GB, for example) or the IMEI is missing, you can download the Samsung PIT file and flash it using Odin to fix the issue.
- Odin can also be used to perform a NAND erase on your Samsung Galaxy device.
Boot your phone or tablet into the Download mode, connect it to your computer via USB, and follow the visual presentation of Samsung firmware installation steps shown in the screenshot below.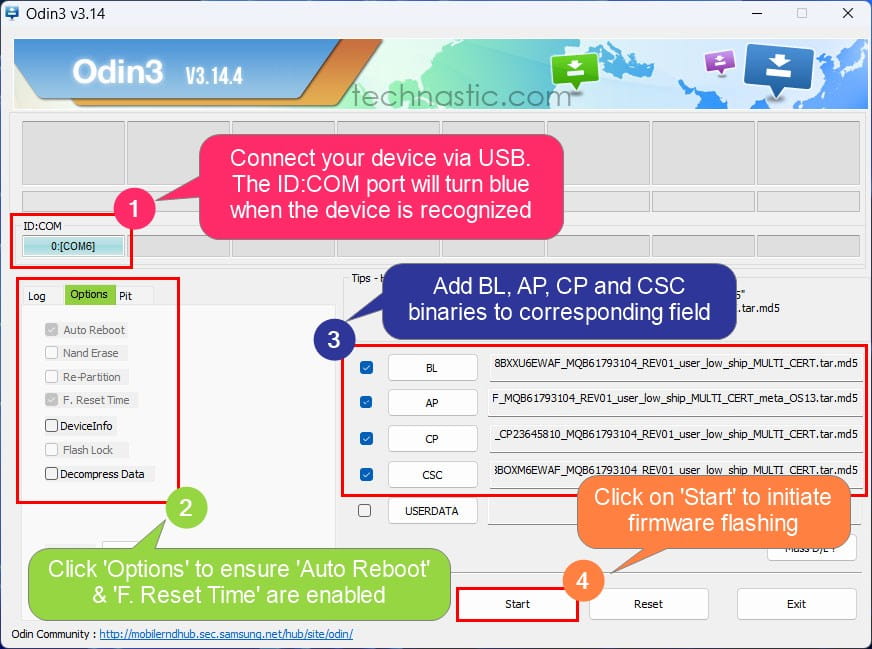
Samsung Odin Keyboard Shortcuts
Below are some useful keyboard shortcuts for Odin that you may find interesting. You can use them to
- Alt + S ➡ Add the BL firmware binary
- Alt + P ➡ Add the AP firmware binary
- Alt + M ➡ Add the CP firmware binary
- Alt + C ➡ Add the CSC firmware binary
- Alt + S ➡ Start flashing
- Alt + R ➡ Reset Odin
- Alt + E ➡ Exit Odin
Odin Flash Tool Options Explained
When you launch Samsung Odin, you’ll be greeted by the Odin window and will see a variety of buttons with options like BL, AP, CP, CSC, UserData, and PIT. If you are not aware of these terms, I have them explained below for better understanding.
- The Boxes: On the top of the Odin interface, you’ll see 3 rows of 8 rectangular boxes. The big ones are called Status Box and they show the flashing progress of firmware images. Right below that sits the Progress Bar and it shows the installation progress of the current binary. The boxes on the 3rd row are USB Serial COM Ports that get highlighted with blue when Odin detects a Samsung device. By clicking on the Mass D/L button located right above the Exit button, you can enable 72 more COM Ports. The total number of boxes is 80 in number because Odin can handle 80 Samsung phones or tablets at the same time.
- Auto Reboot: This option is enabled by default and can be found under the Options tab in Odin. Keep it that way if you are going to flash the stock firmware. However, due to bootloader encryption on most Samsung devices, you’ll need to disable ‘Auto Reboot‘ before flashing TWRP or any custom recovery.
- Nand Erase: If you select this option in Odin, it will completely erase everything on your Samsung device including the Operating System and all data present on it. If you don’t know what you’re supposed to do after performing a ‘Nand Erase‘, you’ll end up turning your device into an expensive paperweight.
- Re-Partition: The option should be checked only if you are flashing a Samsung PIT file along with the firmware. Enabling ‘Re-Partition’ will re-partition your Samsung device to its default state. Don’t use this option unless you understand what partitioning is.
- F Reset Time: Check this option only if you want to reset the firmware flashing timer on your device.
- BP: This means Bootloader and as it’s evident from the very name, it’s used to flash the bootloader file with .tar or .tar.md5 extension.
- AP: On the older versions of Odin, this option was called PDA and was used to flash single-file firmware and recovery images. The full-fledged name of AP is ‘Android Processor’.
- CP: CP stands for ‘Core Processor’ and is used to flash the Modem file that comes with the Samsung firmware binaries package. In the older versions of Odin, this option was called Phone.
- CSC: The full form of CSC is ‘Consumer Software Customization’ or ‘Country Specific Code’. The CSC component of Samsung firmware is specific to network providers and geographical regions. In other words, it contains customizations related to a geographical location, APN settings, carrier branding, and other things. Learn more about Samsung CSC and Home CSC.
- BL: You can use the BL field in Odin to flash the bootloader on your Samsung phone or tablet.
- PIT: Partition Information Table contains information such as device storage partition tables, partition names, block sizes, block counts, and other technical stuff. Every Galaxy phone or tablet has a different PIT file associated with it. PIT files are not meant to be flashed unless a device’s partition table layout has been corrupted for some reason. To add a PIT file in Odin, click on PIT located right above the Log box.
- UserData: If you have created a backup of your phone’s data, you can flash it using this option.
- Start: Once you have added the firmware binaries you want to flash, you can click on the Start button to initiate the installation.
- Log: The log field in Odin displays the installation progress of the firmware binaries and components.
Odin Configuration File ‘Odin3.ini’ Explained
When you extract the downloaded Odin Zip you’ll find 2-5 files inside.
- Odin3.ini
- Odin3 v3.x.x.exe
- 1 or 2 DLL (Dynamic Link Library) files
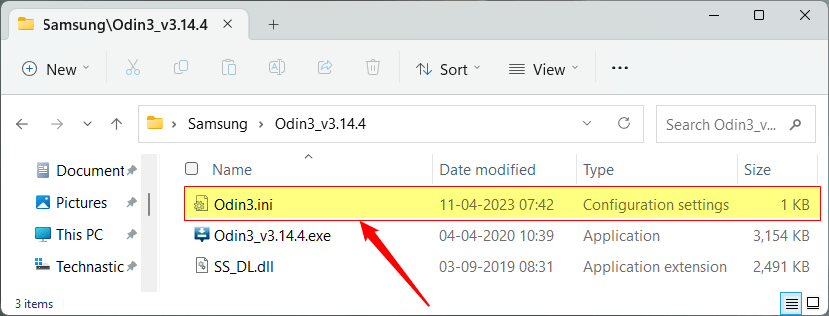
The .ini file is a text file that contains the configuration settings for the Odin flash tool. If you remove this file, Odin will not run at all. It’s editable and you can customize Odin by changing the values and adding more lines to it. Depending on the Odin version you have, the configuration might differ.
The Odin3.ini has a bunch of labels (highlighted with blue). Under each label, you’ll find several flags (highlighted with yellow).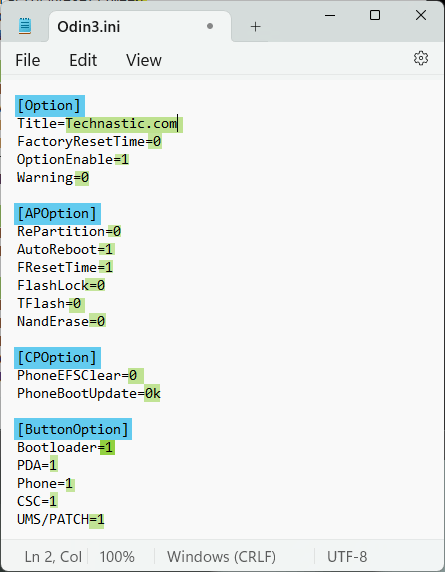
Below, I have explained each label and flag fount in the .ini file for the latest Odin. You can enable or disable any flag by setting its value to ‘0‘ or ‘1‘. (0= disable, 1= enable).
- Label
[Options]Title: You can customize this with any text. For example, if you replace ‘odin’ with ‘Technastic’, the text will display next to the Odin3 header.FactoryResetTime: Changing its value does nothing.OptionEnable: If you change its value to ‘1‘ the items under Odin’s Options tab will be disabled and greyed out.Warning: When you launch Odin, it displays a warning pop-up. You can disable the warning by setting the value of this flag to ‘0‘.
- Label
[APOption]RePartition: This option is used to re-partition a Samsung phone using a PIT file. By settings it’s value to ‘1‘, you can turn on this option in Odin.AutoReboot: Set its value to ‘0‘ if you don’t want your phone to reboot automatically after the firmware is flashed.FResetTime: You can change its value to ‘0‘ or ‘1‘ to disable or enable the factory reset timer while flashing firmware.FlashLock: When enabled, this flag tells the software to unlock firmware flashing so that the device can be programmed again.TFlash: Unknown flag.NandErase: Settings its value to ‘1‘ will tell Odin to wipe the NAND memory on your Samsung device.
- Label
[CPOption]PhoneEFSClear: This option is not found in Odin anymore but is still there in the configuration file.PhoneBootUpdate: By settings its value to ‘1‘ you can enable bootloader update. By default, the value is as follows: PhoneBootUpdate=0k.
- Label
[ButtonOption]: The value for each of the following button options is set to ‘1‘ by default. If you want to disable any button, change its value to ‘0‘.Bootloader: Enable or disable the BL button.PDA: Enable or disable the AP button.Phone: Enable or disable the CP buttonCSC: Enable or disable the CSC button.UMS/PATCH: Enable or disable the UserData button.
Once you have downloaded the latest Samsung Odin, you will need to download the proper firmware binaries for your device. You can download them directly from the Samsung Firmware Update Server using the Frija firmware download tool.


