
How to Digitize a Sketch in 4 Steps with Adobe Illustrator | Skillshare Blog
Have you ever wanted to see your art printed on mugs or T-shirts? Or maybe you’ve dreamed of turning your illustrations into surface patterns and seeing them on pillow cases. You might simply wish to have a digital copy of your art so you can make endless edits and create multiple versions.
You could, of course, draw on an iPad or a drawing tablet. But if you don’t have access to either—or you just love the feel of pencil and paper—you need a way to turn your paper drawings into digital art.
Luckily, this is as simple as scanning and uploading them into a vectorizing software, such as Adobe Illustrator.
Mục lục bài viết
What You’ll Need to Digitize a Sketch
To turn a sketch into digital art, you’ll need the following:
- Paper: Create your sketch on smooth, high quality paper. Textured paper may result in ink bleeding and uneven lines.
- Tracing paper, light table or window: You may need to create a disassembled copy of your sketch by tracing it onto a new piece of paper.
- Pencil and pen: Sketch with a pencil, then outline your sketch with a black ink pen—this will create high contrast and help Illustrator clearly identify what needs to be vectorized.
- Scanner: It’s best to use a scanner to create a digital copy of your sketch, but you can also take a picture of it with a camera or smartphone.
- Adobe Illustrator: This is where you’ll vectorize your sketch, add color and turn it into a finished illustration.
Start digitizing your drawings with this helpful walk-through from teacher Andrea Pippins, and then learn more in her Skillshare Original class, Illustration in Action: Creating Stylized Portraits.
How to Turn a Sketch into Digital Art
Digitize your sketch by following these four steps:
Step 1: Prepare Your Sketch
Adobe Illustrator has a powerful Image Trace function, but it’s not a magic button that will turn any sketch into a perfectly vectorized illustration. To ensure a high quality end result and the flexibility to add color or make other edits, keep the following guidelines in mind as you prepare your sketch:
- If there are any closed shapes that you’ll be filling with color, make sure there are no gaps in the outline.
- If there are any connecting shapes or lines that you’ll be coloring or editing separately, add a gap between them to help Illustrator recognize them as separate.
- If there are any overlapping shapes, use tracing paper to make a copy of your sketch, but trace each shape separately. You will put the pieces back together in Illustrator.
Doing this is not mandatory—Illustrator has tools that allow you to separate and connect lines—but preparing your sketch in advance will save you lots of time and leave you with a much cleaner end result.
Lastly, outline your sketches with a black ink pen and erase any pencil lines.

The original sketches have lots of overlapping shapes, so it’s easier to trace them separately before scanning them into Illustrator. Still from Skillshare class From Sketch to Vector: Digitize Your Sketches With The Shape Builder Tool in Adobe Illustrator by Di Ujdi.
Step 2: Scan the Sketch
If possible, use a scanner to scan your sketch (the original, as well as any disassembled versions). Set your scanner to a high resolution—at least 300 dpi.
If you don’t have a scanner, you can take a photo of your sketch with a digital camera or smartphone. Make sure you have sufficient lighting and use settings that will yield images of the highest possible quality. If you’re photographing multiple sheets of paper, use a tripod to help keep the camera at a consistent distance and make sure all images are the same size.
Step 3: Vectorize the Image
Vector images are built using mathematical equations, rather than pixels. This means you can edit and enlarge them, without affecting quality.
To convert your sketches into vector images, follow the below steps:
- Open up Adobe Illustrator and click on File > Place to place your scanned image or photograph onto the artboard.
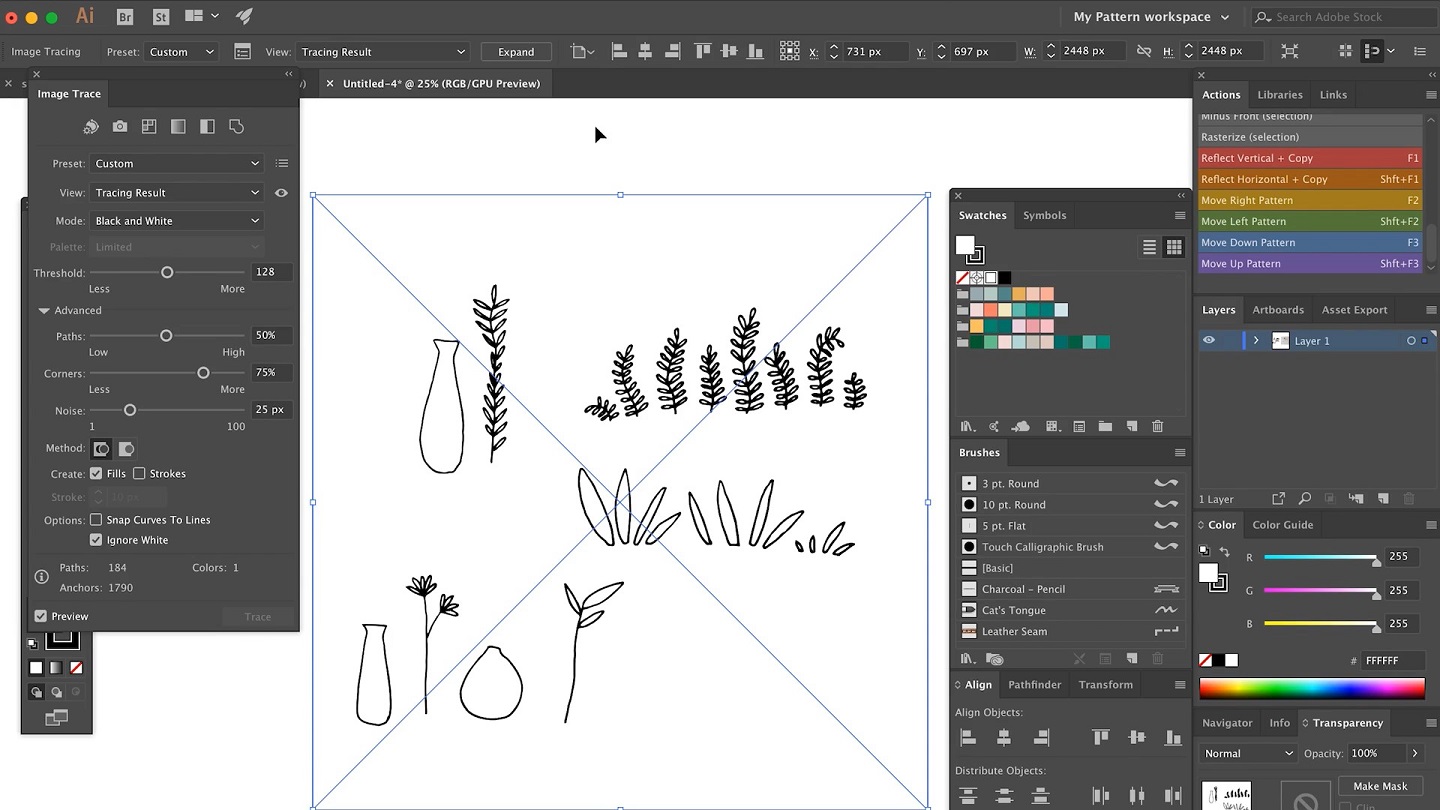
- Go to Window > Image Trace to open up the image trace tool. Click the arrow beside Advanced to open up advanced options.
- Make sure the Mode is selected to Black and White. Under Options, uncheck Snap Curves To Lines and check Ignore White.
- Click Preview in the bottom left corner to see what your vectorized image will look like. You can play around with settings like Threshold, Paths, Corners and Noise to make adjustments, but you likely won’t need to.
- Once you’re ready to vectorize the image, unselect Preview and click Trace in the bottom right corner.
- With the image selected, click on Object > Expand and hit OK in the window that pops up.
- At this point, your vectorized image is split into different paths, but they’re all grouped together. Right click on the group and click Ungroup.
- You should now be left with black lines that you can scale, move around, manipulate and color.
Use the Image Trace function in Adobe Illustrator to convert your scanned or photographed sketch into a vector image you can edit. Still from Skillshare class From Sketch to Vector: Digitize Your Sketches With The Shape Builder Tool in Adobe Illustrator by Di Ujdi.
Step 4: Add Color and Put It All Together
Now that your sketches are vectorized, it’s time to add color and polish them up.
If you want to keep the black outline in your illustrations, you can use the Live Paint Bucket tool to color the space inside the outline. You can also change the color of the outline itself. If you’d like to separate any outlines so you can apply different colors to them, simply use the Eraser tool.
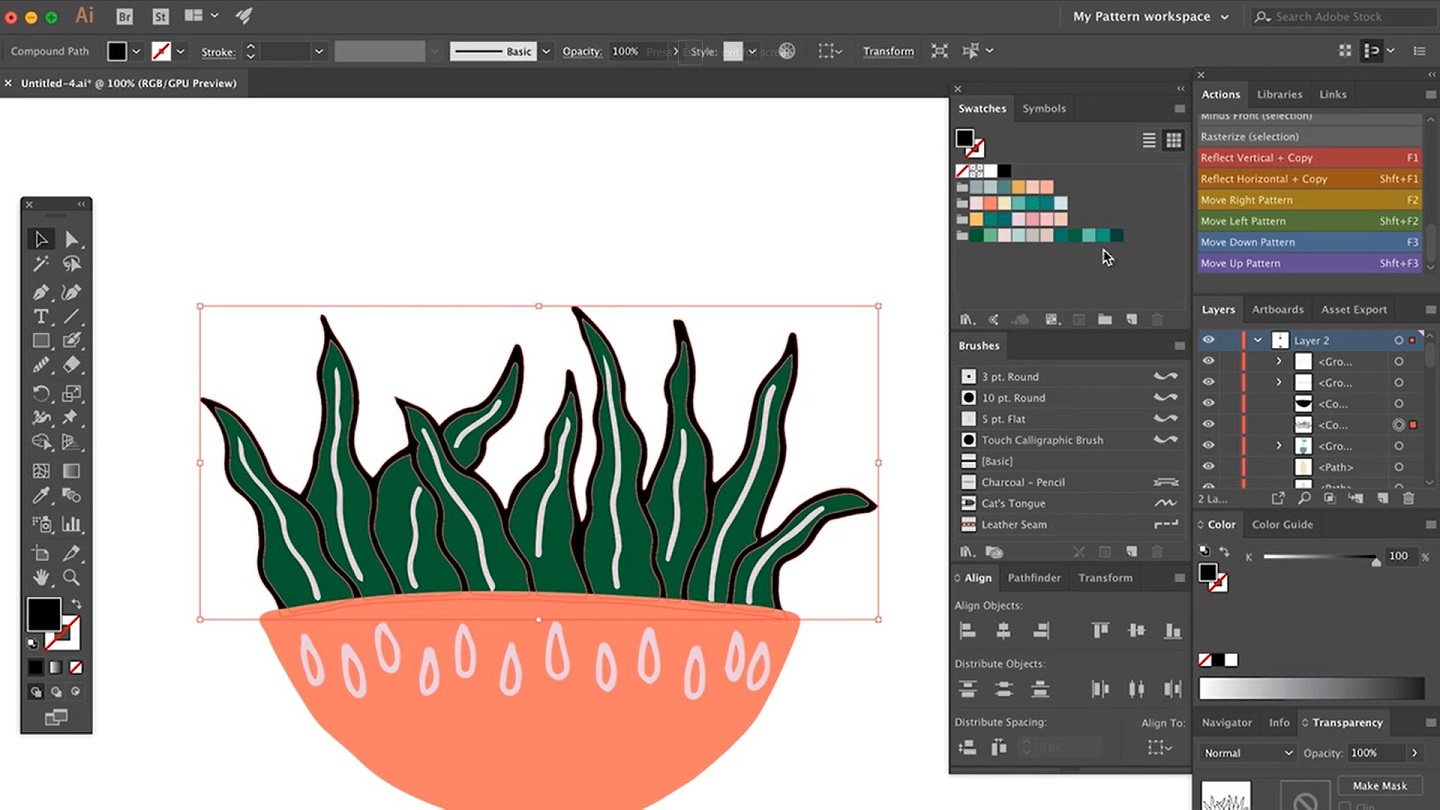
In this example, Di separated the leaves from the pot using the Eraser tool and added colors. Since the leaves have a black outline, it’s clear that they are overlapping. Still from Skillshare class From Sketch to Vector: Digitize Your Sketches With The Shape Builder Tool in Adobe Illustrator by Di Ujdi.
If your illustration style doesn’t include outlines, you can use the Shape Builder tool to turn your outlines into solid shapes. Simply select your outline, choose the Shape Builder tool from the toolbox (or press Shift+M) and drag your cursor across the outline. You should now have a solid shape.
If you’re choosing this illustration style, separating your sketch using tracing paper is especially important. Take a look at the illustration above, for example. If it didn’t have an outline, it would be impossible to see that the leaves overlap—they would just appear as one large green shape. To show each individual leaf, you’d need them as separate shapes so you can color them in slightly different shades of green or play around with their transparency.

In this example, Di sketched each leaf individually using tracing paper. She was then able to turn each leaf into its own shape using the Shape Builder tool and color them in different shades of green. Now, even though there is no outline, you can clearly see that the leaves overlap. Still from Skillshare class From Sketch to Vector: Digitize Your Sketches With The Shape Builder Tool in Adobe Illustrator by Di Ujdi.
Alternatives to Adobe Illustrator
By far, the most common tool used for digitizing art is Adobe Illustrator. But if you don’t have access to Illustrator, you can try any of the following free alternatives:
1. Inkscape
Free software you can use to trace a photo or scanned copy of your sketch, Inkscape will turn it into a vector image. You can also edit your vectorized sketches directly in the program. Inkscape is available on Windows, Mac OS and Linux computers.
2. Vectornator
This free graphic design application is for Macs, iPads and iPhones. Vectornator‘s Auto Trace tool is similar to Illustrator’s Image Trace, and it has lots of other features that will allow you to add color and edit your illustrations.
3. Web-Based Tools
Simply type “vectorize image for free” into Google, and you’ll come across a number of free tools that will help you turn your sketches into vector images right in your browser. You can then use another web-based tool—Vector Ink, for example—to add colors and edit your illustrations.
Digitize Your First Sketch
Once you learn how to vectorize images, you can turn just about anything into an editable, scalable illustrations. Try vectorizing calligraphy or paintings, or even turning photographs into digital portraits. Grab your sketchbook, power on your scanner, and get ready to explore the limitless world of digital art!

A Step-by-Step Guide to Digitizing Your Sketches
Digital Illustration: Doodles to Designs With Jon Burgerman
Take the Class


