How to fix Javaw.exe error in Windows 10 / 11
Are you seeing an error message “A Java Runtime Environment (JRE) or Java Development Kit (JDK) must be available to run …” while trying to open a Java IDE? Don’t worry. This error usually occurs when the Java IDE doesn’t recognize the actual path of Java.exe. Simply follow these easy steps to solve your issue
NOTE–
A. You will need to download the Java SE Development Kit 8. In the process, you will need Oracle verified Email ID and Password of your own. You can create a new account when at the time of downloading the development kit. If you have one, you may proceed to the main solutions-
B. If you have downloaded and installed the Java SE Development Kit previously on your computer, then you can skip STEP-1 and STEP-2 of the solution.
Mục lục bài viết
Fix- Add new Environment Variables-
Adding new environmental variables will solve this issue on your computer.
STep-1 Download Java SE Development Kit
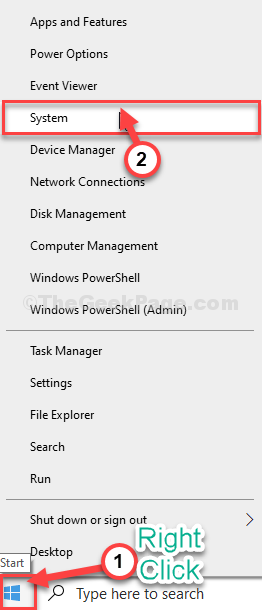
1. Right-click on the Windows icon and then click on “System“.

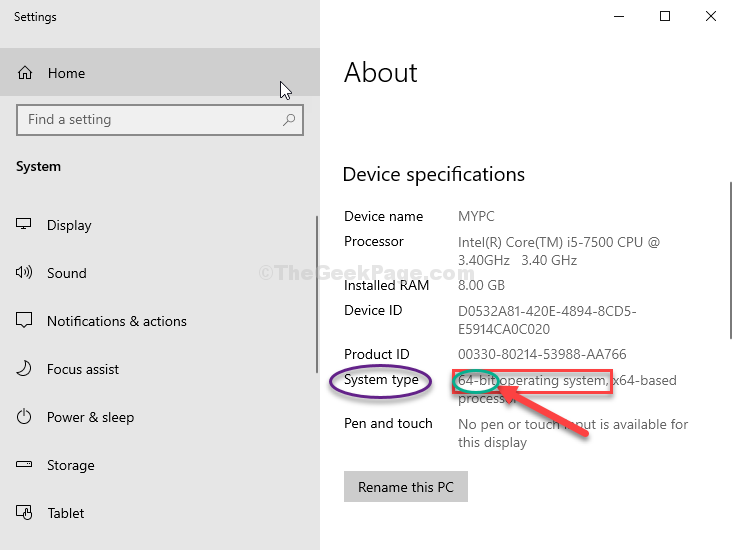
2. Now, scroll down and check the ‘Device specifications‘.
3. Note the ‘System Type‘, whether it is “64-bit” or “32-bit“.

Close the Settings window.
4. Now, you have to download Java SE Development Kit 8.
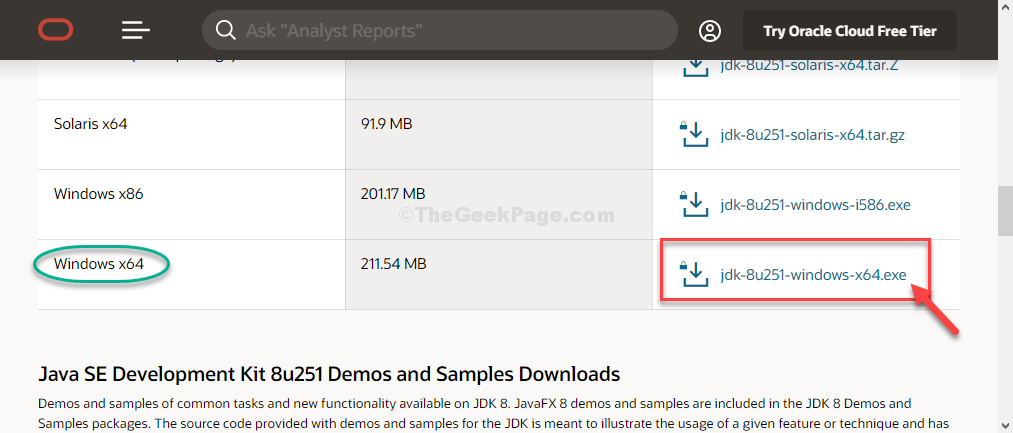
5. Scroll down through the webpage and click on the appropriate JDK file according to your system specs (64-bit resembles Windows x64 and 32-bit represents Windows x86).

6. Now, check the option “I reviewed and accept the Oracle Technology Network License Agreement for Oracle Java SE“.
7. Then click on the “Download jdk-8u251-windows” to download the installer.
ADVERTISEMENT

8. In the next window, you will need to enter your Oracle verified Email address and the password. (If you don’t have an Oracle account, you have to create one).
9. Then, click on “Sign in“.
The downloading process will start instantaneously.

Once you have downloaded the kit, close the browser window.
STEP-2 Install the Java SE Development Kit 8-
Now, we are going to install it.
1. Go to the location on your computer where you have downloaded the installation package.
2. Double click on “ jdk-8u251-windows-x64” to run the installer.

3. Now, click on “Next“.

4. Again, click on “Next” and the installation process will kick in.

5. When the installation process is complete, click on “Close” to close the installed.

STEP-3 Add a new Environment Variable-
Installing Java alone won’t help to run the Java applications. You have to clearly declare the path of Java to run those applications.
1. At first, press Windows key+E to open the File Explorer window.
2. In the File Explorer window, on the left-hand side, click on “This PC“.

3. Now, on the right-hand side, double click on “Local Disk C:” drive to access it.

5. Inside Local Disk C: drive, double click on the “Program Files” folder to open it.

6. Now, double click on the “Java” folder to access it.

7. Again, double click on the “jdk1.8.0_251” folder.

8. Now, double click on the “bin” folder to access it.

9. Inside bin folder, right-click on the address bar and then click on “Cut” to cut the folder location.
10. Next, click on “This PC” to navigate back to the starting point.

11. After that, right-click on “This PC” and then click on “Properties“.

12. In the System window, on the left-hand side, click on the “Advanced system settings“.

13. Go to the “Advanced” tab.
14. Now, click on “Environment Variables“.
ADVERTISEMENT

15. Now, click on “New…“.

16. Now, set the ‘Variable name:‘ as “Path“.
17. Similarly, in the ‘Variable value:‘ section, press “Ctrl+V” to paste the location of the bin folder you had copied earlier.
18. Finally, click on “OK” to save the changes.

19. Now, you can see the new variable in the list of ‘System Variables‘.
20. Click on “OK“.

21. As the last step, in the System Properties window, click on “Apply” and then on “OK” to save the changes.

Close File Explorer window.
Reboot your computer. After rebooting your computer try to open the Java IDE again on your computer. It will work without any error.


