How to use Samsung Notes in Windows 11/10
Samsung Notes has been known to give its competitors a run for their money, being the primary note-making app that many Samsung users (which comprise a substantial share of the total market) use. Being a built-in app, many users, including myself don’t feel the need to download a third-party app. Some drawbacks can be really concerning for those who take note-making very seriously. The app doesn’t allow cross-platform accessibility to one’s work, so the notes you takedown on your Samsung won’t be available to you on any other phone. There is, however, a Microsoft Store version of the Samsung Notes app. In this article, we will be demonstrating how you could set up and use Samsung Notes on Windows PC.
Mục lục bài viết
How to install Samsung Notes on Windows 11/10
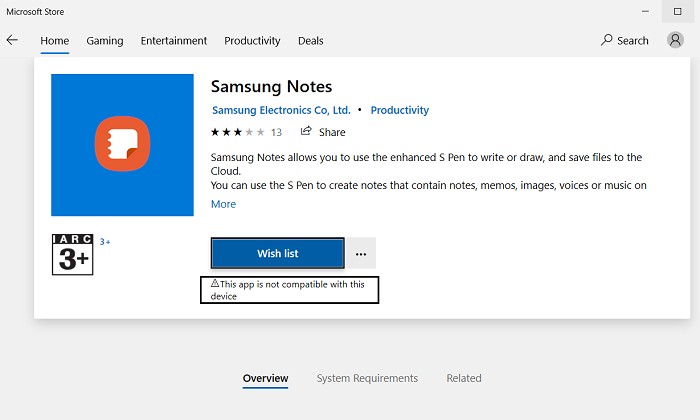
As has already been mentioned, you can access Samsung Notes using the official Windows app and syncing your Samsung account with it. Sadly, it may not be as straightforward as it seems. There’s a high chance that the Microsoft Store may show the app to be incompatible with your PC unless it’s a Samsung PC. There’s a trick you can follow to side-step that below are the steps you need to take:

- Open Microsoft Store and in the search bar type the app’s name; Samsung Notes.
- Make sure that you have your Microsoft account logged in, the same one that’s registered on your PC.
- On the app’s page, you’ll see a Get button.
- Don’t click on that, since that’ll direct you to the store. Instead, click on the three-dotted icon below it and further select Add to Cart.
- If you don’t see a three-dotted icon, you may need to use your phone’s browser to complete the process.
- Open the same link on your phone and click on Get. You will then be asked to log into your Microsoft account.
Do so, and then if you see an option to install it on your PC (see picture below), skip to the step where we’re using the Microsoft Store’s library.
If you don’t get an option to install, follow the steps below. For those performing this on their PC, add it to your cart, proceed to checkout and place your order (the billing amount being $0).
Now, open the Microsoft Store app and search for Samsung Notes again. You’ll see an option to install the app. If the install button is greyed out, like it was for us, there are just a couple more things you have to do.
Go to the store’s homepage. From the three-dotted icon on the top-right, click on My Library.
Select to sort the list based on apps and right on top you’ll see your recently purchased Samsung Notes app. Click on Install here. It’s a 250MB app, so naturally, it’ll take some time.
How to set up Samsung Notes on Windows 11/10
Now that you’ve downloaded the app, it’s time for you to set it up on your PC. Open the Samsung Notes app and from the options pane to your left, click on the settings option sitting right on the top. Select Samsung Cloud and sign in with the Samsung account that is registered on your phone, or wherever you have the notes that you want to sync with your PC. Wait for a while and then, you will have access to your notes. These can be created, edited, or deleted from your PC itself now.
It is unlikely, but you may face some issues while trying to sync your Samsung ID with the Notes app on your PC. Maybe the sign-in isn’t going through properly, in which case there are some troubleshooting methods that you can implement.
- Restart your PC
- Ensure that you use the correct credentials of your Samsung account.
- Disable and enable Samsung cloud
- Uninstall and reinstall the app
We hope that not only are you now able to install the Samsung Notes app on your PC, which is ordinarily not available for most, but also able to use it to add to or delete from your existing notes by syncing your Samsung Account.


