
What’s the Best YouTube Video Format? (2023 Guide)
There are over 2 billion YouTube users with more than 122 million daily active users. Safe to say, if there’s a time to start building or optimizing your YouTube presence for more engagement and viewership—it’s today.
But the most pressing question for new and existing creators alike is—what’s the best video format for YouTube. And that’s exactly what we’re going to explore in this article, with other important things like how you can convert one format to another to make your videos a platform-fit and tips to optimize your video better for the search engines.
Table of Contents
- What is the best video format for YouTube?
- What’s the best video file size for YouTube?
- How to convert your video to a format accepted by YouTube
- How to upload a video to YouTube
- How to load a custom thumbnail
- How to optimize your video for search engines
Mục lục bài viết
What is the Best Video Format for YouTube?
MP4 is the best video format for YouTube, with a standard aspect ratio of 16:9, H.264 video codec, and AAC-LC audio codec.
To display the best quality videos and provide the best viewing experience to your audience, YouTube also recommends using original videos with high or HD resolution.
While MP4 works best for YouTube, there are other formats you can use too. While all of these are accepted by YouTube, most are containers or codecs which compose the video file.
- MP4: MPEG-4 Part 14, commonly known as MP4, is one of the most widely accepted container formats for portable devices and streaming formats for the internet. While it’s commonly used to store video, you can also save subtitles and still images.
- MOV: A video format developed by Apple, MOV can hold multiple types of videos and multimedia files. It works best in Windows, Apple products, and their video players like Quicktime.
- MPEG4: Developed by the Moving Picture Experts Group (MPEG), this format is mainly used to store compressed video and audio files, designed for low bandwidth encoding. If you want to upload encoding settings on YouTube, MPEG4 should be your go-to choice.
- AVI: Audio Video Interleave (AVI) was developed by Microsoft as a multimedia container. It’s mostly used to save files with synchronous digital audio and video playback.
- WMV: Windows Media Video (WMV) file is a series of video codecs and compressed video container formats for Microsoft. It’s mostly used to sell video content online or through portable video containers like DVDs.
- MPEG PS: The Program Stream, commonly called MPEG PS, is mainly used for multiplexing digital, audio and video files. This format is often the best fit for DVDs and HD DVDs.
- FLV: Flash Video is used to distribute video content over the internet using Adobe Player from version six to the latest one. It’s used to store and deliver synchronous audio and video files.
- 3GPP: 3rd Generation Partnership Project is a multimedia file used to store and share video and audio on 3G mobile phones.
- WebM: Primarily intended as a royalty-free alternative for HTML5 video and audio elements, WebM is an audiovisual media format today. It contains compressed audio and video files.
- DNxHR: Digital Nonlinear Extensible High Resolution (DNxHR) is a UHD TV post-production codec that cannot be reversed. It’s fit for use on devices and platforms with over 1080p screen resolution.
- ProRes: ProRes, developed by Apple, is a high-quality, lossy video compression format. It’s mostly used in the post-production phase of videos with resolution upto 8K like commercials, features and streaming.
- CineForm: GoPro-acquired, CineForm is an open source video codec used to edit high-resolution videos with little to no difference in quality even after multiple codecs.
- HEVC (h265): High Efficiency Video Coding (HEVC) is a video compression standard that supports resolution upto 8192×4320. It’s one of the most widely used video coding formats after the Advanced Video Coding (AVC).
What’s the Best Video File Size for YouTube?
YouTube allows you to upload videos in many different file sizes, but your best bet would be to go with the platform’s recommended setting for uploading the highest quality videos:
- 2160p (4K video quality)
- 3840p x 2160p
Some other important guidelines to consider:
- 128GB is the maximum file size on YouTube
- 120 hours is the maximum video length
Apart from what YouTube recommends, there are other files accepted by the platform too.
Here’s what you can follow to ensure the best upload quality for your videos while complying with YouTube’s guidelines to avoid issues like cropping:
Resolution
Dimensions
Quality
2160p
3840p x 2160p
4K Video
1440p
2560p x 1440p
2K Video
1080p
1920p x 1080p
Maximum video resolution for HD YouTube viewing
720p
1280p x 720p
Minimum video resolution for HD YouTube viewing
480p
854p x 480p
Standard definition for YouTube viewing
360p
640p x 360p
Best for embedding YouTube videos on websites
240p
426p x 240p
Minimum YouTube video size—good for watching videos with slow internet connection
While YouTube accepts videos with all these file sizes, using the larger resolution and dimension is always the most preferable.
You must be wondering — if YouTube accepts a range of video file formats, why should you pay attention and optimize your video for the best format? Let’s break this down quickly:
- To ensure an excellent viewing experience for your audience on YouTube (a video-only platform)—ensuring your videos comply with the platform’s best upload settings would be beneficial.
- Each file format is processed differently on YouTube which might affect video quality and thus the playback. So, using the recommended settings with high resolution, you can avoid this issue and ensure a good experience.
- Some video formats on YouTube process the right way but display a larger file size on upload, which ruins the sharing experience on social media.
Now that dimension guidelines are sorted, let’s see how you can convert your video into a format accepted by YouTube to optimize your content for the platform.
How to Convert your Video to a Format Accepted by YouTube
If you don’t have a video in the accepted YouTube video format (.mp4, .mpv, .mpeg, .wmv, .avi, .mpegps, .flv, 3GPP or webM), you will see an error which says, “invalid video format.”

To avoid this, and upload the video in a format recommended by YouTube, here’s how you can convert your video in any format into an MP4.
- Open Cloud Convert, a free online file format converter that supports over 200+ formats.
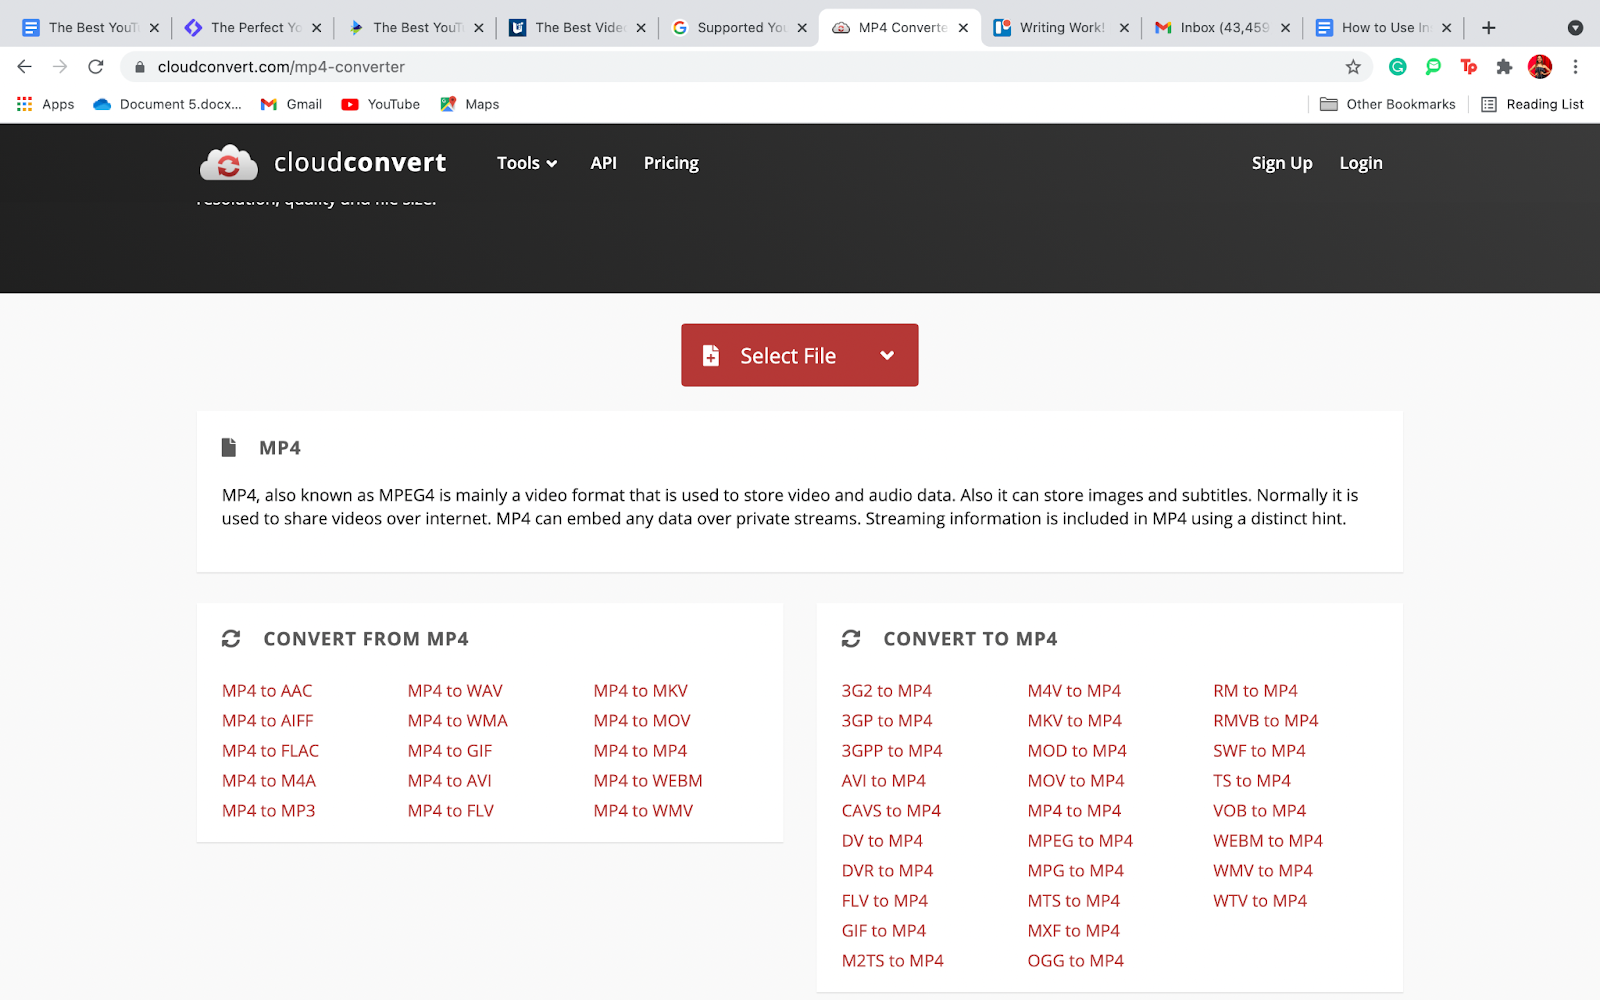
- Choose your current video format from the list.
- Upload your file in the “Select file” option.
- Customize video and audio settings as per your preference.

And voila—your video is now converted into Mp4, ready to upload on YouTube.
How to Upload a Video to YouTube
Once you have the video in Mp4, the YouTube recommended file format; you can move along and upload it on YouTube. Follow this step-by-step process:
- Log in to your YouTube account and open YouTube Creator Studio.
- Click on “Create” next to your profile icon, and choose “Upload video.”

- Click on “Select files to upload” or drag-and-drop your video from files.
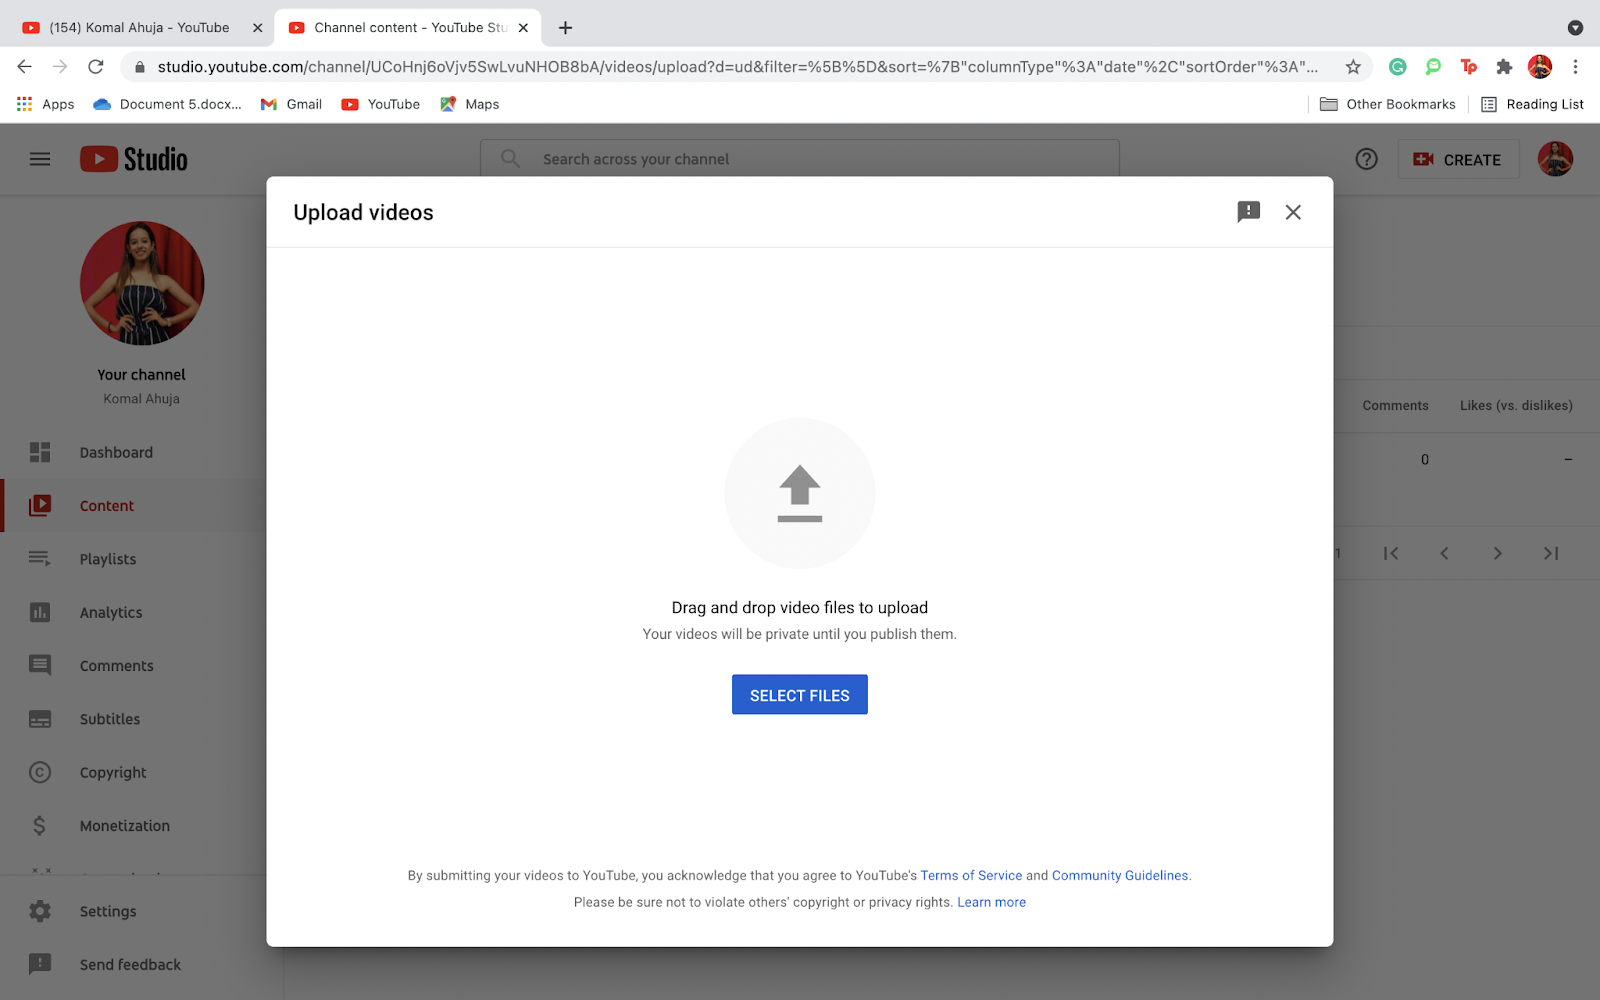
- Add the title, description and thumbnail to enhance your video further. These are essential aspects of the video, so ensure it communicates what your video is about clearly.

- Add subtitles, end screens, and cards to optimize your video for the YouTube search engine and invite clicks to other related videos or off-platform blogs.

- Adjust your visibility settings to the public, and schedule the video or post it right away.

And there you go—you’ve successfully uploaded your video on YouTube.
How to Load a Custom Thumbnail
YouTube allows you to select a thumbnail from the video itself. But the best way to grab eyes and invite more viewers to your video is by having an attention-grabbing custom thumbnail. To display a crisp and clear image, use a thumbnail image with a resolution of 1280p x 720p.
As per YouTube Creator Academy, over 90% of the best-performing YouTube videos have custom thumbnails.
You can brand your thumbnail with colors, designs, typography and visual elements. If you don’t have much technical know-how, you can make it on Canva with ready-made templates.
Nevertheless, having a custom thumbnail is always better, so here’s how you can upload it to your videos.
- Open your YouTube channel, and click on “Customize channel.”

- Click on “Settings” in the bottom left corner.

- Navigate and click on “Channel.”

- Click on “Feature eligibility” and then the phone verification option. This will send a code to your mobile device, which, when you enter, your account will get verified, allowing you to upload custom thumbnails.

- Next, go to your channel content and click the pen or edit button for the video you want to upload the custom thumbnail.

- In the thumbnail section, you’ll get an option to upload your thumbnail file.

With this, you have successfully added a custom thumbnail that’ll enhance your video and drive more clicks. Now, let’s see how we can boost your video’s presence on YouTube, so it ranks well when your audience searches for relevant keywords.
How to Optimize Your Video for Search Engines
Imagine spending all that time brainstorming ideas, creating the video, editing it, and publishing it on YouTube, only for it to be hardly discovered by your audience. If you want to push your video on the platform and ensure it doesn’t get lost in a pool of similar videos—you need to optimize it for the search engine.
Before we discuss how you can enhance the visibility of your videos, so it gets discovered by the right people, let’s talk a bit about what VEED achieved following the exact same strategies.
VEED launched its YouTube channel in March 2020, and in less than a year and a half, here’s what our stats look like:
- YouTube generates over 40,000 new users for us every month.
- We have gone from 0 to 25,000 subscribers.
- 8% of our site traffic comes from YouTube.
- We have generated nearly 200 (and growing) conversions from YouTube.
- A single video of ours has led to over 150 paid conversions.
- The channel gets over half a million views every month.
Now, if these stats sound interesting for you and you have a similar (or better) vision for your YouTube channel, follow these tips to optimize your video for the search engine and get more visibility:
Create and Upload an SRT Subtitle File to Your Video
A SubRip Subtitle (SRT) file is a plain text file used to add subtitles to your videos. It’s compatible with most social platforms, mostly YouTube and allows you to make your videos more inclusive for those who are deaf, hard of hearing or want to consume content with their sound off.
Apart from this, they significantly help with YouTube SEO and getting more engagement on your videos. Unless you already have subtitles as part of your video file, you can use an SRT file to download and upload subtitles to your YouTube videos.
All our most successful videos have one thing in common—they have a closed caption file that helps both YouTube and Google understand our content. This increases our chances of double-dipping by ranking on not one but both search engines.
So, if you want to get such results for your channel—you can easily create an SRT file through VEED. You can directly upload the video to the VEED editor or insert the YouTube URL of the chosen video, and it will automatically generate subtitles.
You can then download and externally upload it on YouTube so your audience can enjoy the video with the subtitles. This will enhance their viewing experience further and increase your chances of ranking higher on the search engine.
Front Load Your Video Title with Your Main Keywords
The title of your video is not just important to communicate what the video is about and invite users to watch it.
It significantly contributes towards SEO as well. Since it’s the first thing your audience sees on the results page, it needs to be clear and concise, which will often determine if they will click on your video or not.
Good thing you can optimize your title for better ranking and searchability.
To begin with, your title should be more than five words long, so you can add your main keywords earlier on in the title to avoid keyword stuffing. This is also important because YouTube places more weight on this, and you can grab the viewer’s attention with the important words first.
If you search for “YouTube SEO,” you’ll notice the top-ranking videos have placed the keyword in the first half of the title.

While including the keyword at the beginning of your title, ensure it fits naturally to tell the viewer what they’re about to see in the video. Lastly, ensure your title is under 60 characters; otherwise, it might get cut off on the results page.
Use The Right Tags to Help YouTube Categorize and Distribute Your Content
The best way to communicate the content and context of your video to YouTube is through descriptive tags. These targeted tags are great not just for ranking for keywords, but also for showing up in the suggested videos side panel for related keywords. It gives you wider coverage, and the potential to rank for multiple keywords, thus offering your videos more visibility.
As a general rule of thumb—include enough tags to help YouTube categorize and understand your content but avoid stuffing them. This way, the platform understands how to sort your video with other related videos without looking at it as spammy.
We follow the TAB formula for adding tags to our keywords:
Target: Include the target keyword(s) first as YouTube will give priority to it.
Alternative: Add any relevant variations of the target keyword (about 2-3). To find these, type in your main keyword and look at the suggested ones to pick alternatives that relate to your video.
Broad: Towards the end, include broad terms that connect back to the topic of the video, our industry, who our target audience is or topics of other similar videos we’ve created.
For example, for one of our top videos on “How to add subtitles to a video,” here are some of our tags following the TAB formula:
T – how to subtitle a video automatically
A – auto subtitle tool
B – video editing, video content creators, video marketing

Write a Strong Description with Trackable Links
Your YouTube video description holds immense value. It conveys the context of your video to Google and YouTube—the better they understand it, the higher your chances of ranking well. Not only this, but it also impacts your chances of showing up in the related or suggested sidebar for related videos.
Apart from this, descriptions are great to provide your viewers with further clarity on your video. You can explain some parts of your video, and even add links to related blog posts, social media posts, products or any relevant page on your site.
Here are some things you can include in your video description:
- Mention the target keyword(s) in the first 150 characters. This will be the text preview you see on the YouTube search results page under the title.

- Add timestamps and plug in relevant keywords to make it easy for your audience to navigate and jump to different chapters in your video. This is great to optimize your video for people who don’t want to watch the entire video, and quickly watch what they came looking for.

- Add trackable UTM links to any relevant content on your website. This will allow you to measure the success of your link insertion and what results it helped you achieve.
- Link to your relevant videos and playlists to encourage viewer retention and channel watch time.

- Towards the end of the description, add a short blurb about you/your business and what you do.

- Use a High Contrast Thumbnail Design
Attract more viewers to your video with well-designed thumbnails with high-contrast colors and a sweet balance of visuals and typography. Since thumbnails are among the first things your audience sees on the search results page, it builds anticipation and represents what they can expect from your video.
Before you start creating your thumbnail, search for the topic you’re trying to rank for and look at the design of the content thumbnails. Take note of how you can style your video thumbnail to stand out from the crowd, so viewers pick you among a pool of similar videos.
For example, when you’re in a grocery store with aisles full of similar products, what’s the first thing you consider while making your pick? It will often be unique packaging because first impressions matter and significantly influence decision-making.
Similarly, thumbnails help viewers decide which video they should watch among multiple results on the search page, so it needs to stand out.
To do this, you can use high contrast colors like pink, green, blue, yellow, purple, and their shades to grab your viewer’s attention. Avoid using colors like red or white, which are similar to the YouTube interface—rather design for disruption, so yours is the first thumbnail they see when the results page loads in.
Here are some other things to keep in mind:
- Avoid overcrowding your thumbnail with excess visual elements or clashing colors.
- Brand your thumbnail to build recall value, so viewers understand it’s you when they see more of your videos in suggestions.
- Add a catchy title to your thumbnail, and align visual elements to relay context.
- Avoid clickbait and over-sensational thumbnails. Rather focus on ensuring your thumbnails deliver the promise and catch the viewer’s eye without making it seem off.
Apart from these five strategies to optimize your videos for the search engine, you can also work on other aspects like adding relevant YouTube end screens and cards to hook your audience to your content.
Creating and maintaining a YouTube channel is not just about shooting and uploading content. It has a lot to do with ensuring your videos align with the platform’s recommended settings, like the Mp4 video format and file size.
Once you’ve got the basics covered and are ready to share your videos with the world, you can optimize them for the search engine using our channel-inspired strategies and push your videos to the top for enhanced viewership and visibility.Stuck with a video in another format? You can always come back to this guide again and see how you can comply with YouTube guidelines, convert it into Mp4, and make it rank-ready for the search engine.


