
Adobe Premiere Pro Download for Free – 2023 Latest Version
Adobe Premiere Pro has all the essential tools for just about anyone to produce a professional-style video. If you’ve never used a video editing program, it may take some time to master Premiere Pro, although it does have helpful video tutorials that can help get you started right.
While Premiere Pro is a premium tool, follow the instructions below, and I’ll show you how to download it free for 7 days.
Download Adobe Premiere Pro for Free
How to Download and Install Adobe Premiere Pro for Free
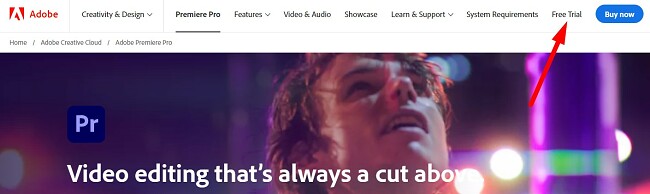
- Go directly to the official Adobe Premiere Pro download page.
- Click the Free Trial option on the top right side of the menu bar.
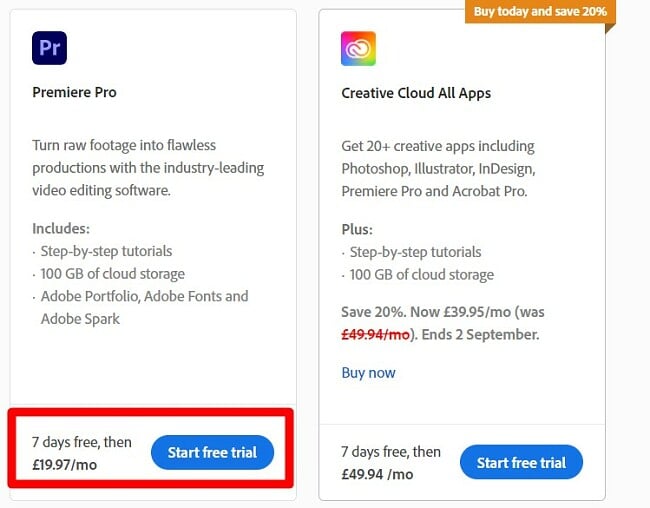
- Adobe gives you the option to download just the Premiere Pro software, or you can test the entire collection of Adobe Creative Cloud apps. This package includes programs like Photoshop, InDesign, Illustrator, Acrobat Pro, Lightroom, and more. In both cases, Creative Cloud will install on your computer. I’m only downloading the Premiere Pro software, but the instructions are the same for both options. Once you make your decision, click the Start Free Trial button.
- Whether you have an account with Adobe or not, you will need to enter your email address. This will be the username you’ll use for logging in to your Premiere Pro account.
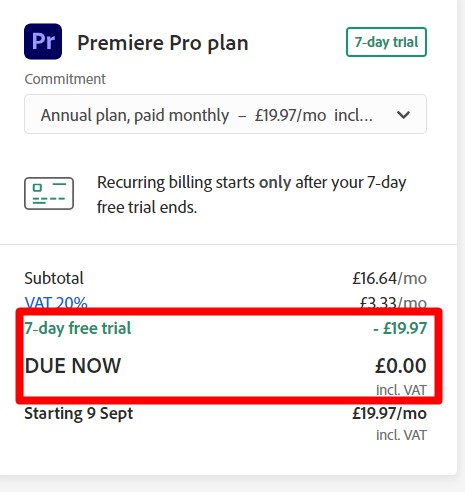
- Even though Adobe offers this as a free 7-day trial, you still need to enter your credit card or PayPal information. You won’t be charged until after the free trial period is over.
- You will be prompted to enter a new password. It must be between 8-20 characters. When you’re done, press the Continue button.
- The Creative Cloud set file will download to your computer.
- When the download is complete open the file to begin the setup wizard.
- Type in your new password, and Creative Cloud will automatically begin installing on your computer.
- When the Creative Cloud installation is complete, it will immediately begin installing Premiere Pro. If you opted to install all the Creative Cloud apps, they would begin to install one at a time.
Download Adobe Premiere Pro for Free
Adobe Premiere Pro Overview
Adobe Premiere Pro is the industry-standard video editing program. It’s used by everyone from amateur filmmakers and students to marketing professionals and movie producers. It features an easy-to-use nonlinear multi-track editing board, a massive collection of tools. As a part of the Adobe Creative Cloud, it’s easy to add elements from other Adobe software to your video.
Premiere Pro underwent a major overhaul to its look and feature recently. Some of the new features include Auto Reframe tools, updated text, graphic, and audio tools, additional codec support, and a Quick Export feature, to name a few.
The software is way too big to go over everything in this review. Instead, I’ll focus on some of the highlighted features and new updates.
Adobe Premiere Pro Features
While Premiere Pro is available to anyone, it does have a host of professional tools that can take some time to master. Thankfully, Adobe has some excellent resources to help anyone from aspiring film producers to marketing executives get a better handle on using the various tools to get the desired effects.
Premiere Pro has two types of tutorials; ones that open in the app and those on your browser. I find the in-app guides to be the most helpful since they give you hands-on experience as you learn different techniques. The browser-based tutorials rely on step-by-step guides and videos to teach you how to perform various video editing functions.
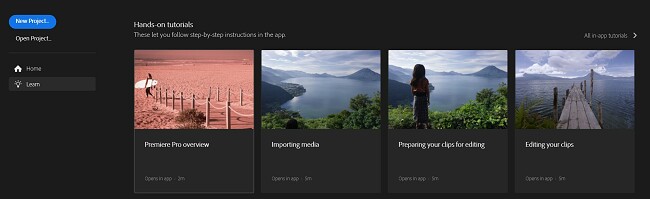
Some tutorials you can view in the Premier Pro app
Mục lục bài viết
Four Types of Editing Tools for Trimming Video
There are four different ways to edit a video in Premiere Pro. The Ripple and Roll edits are designed to work with the space in between two video clips.
- Roll: When you have multiple clips, you can trim the In Point of the first video and Out Point of the second video without changing the length of the two clips.
- Ripple: Close the gaps on the left and right of trimmed clips created by edits.
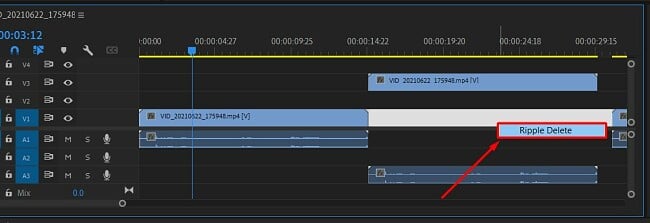
The Ripple tool can close the gap between two clips
The Slide and Slip tools are crucial for adjusting two cuts in a sequence of three video clips.
- Slide: When you use the Slide edit to move a clip to the right or left, it automatically trims the clip that it moves over.
Slip: Change the clip’s In and Out points by the same number of frames going in both directions. The Slip tool changes the starting and ending frames, but it doesn’t change the clip’s duration or affect the surrounding video clips.
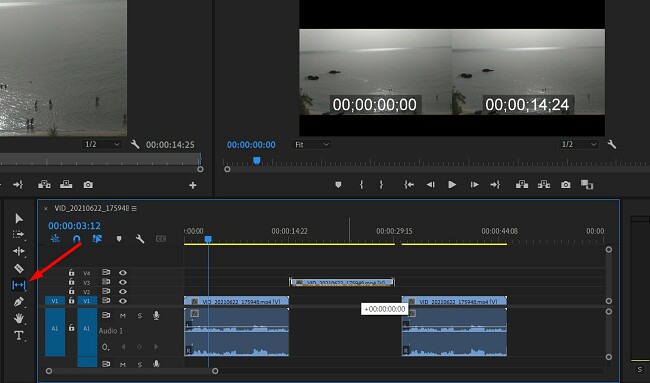
Using the Slip tool to edit the middle video clip
While Slip and Slide are generally used on the middle clip, they both work where the video clip is the first or last one in the sequence.
Automatically adjust your Video Dimensions with Auto Reframe
While it would be nice for all the different social media platforms to choose a standard size for video clips, it doesn’t look like that will ever happen. This makes it difficult to produce a video that looks good on Facebook, Twitter, TikTok, Instagram, and any other medium.
The Auto Reframe tool was designed to make it easy to adjust the aspect ratio of your video without having to reformat the video.
Using advanced technology, Premiere Pro can analyze the video and make adjustments without losing important objects or cropping out a person’s head or some other object around the video’s border.
It’s important to note that this is still a new update, and it’s not quite perfect. The feature works best with objects that the Auto Reframe algorithm can correctly identify. Look over the videos before producing a final cut, and if you need, you can always make minor changes to the framing to perfect the video. For the most part, I had no issues with the videos I created, and I found this to be a big time saver.
To open the Auto Reframe tool, click on the Sequence button on the menu bar on the top of the page and click on the Auto Reframe Sequence option. This will open a dialogue box, and you can choose a preset size or choose custom dimensions.
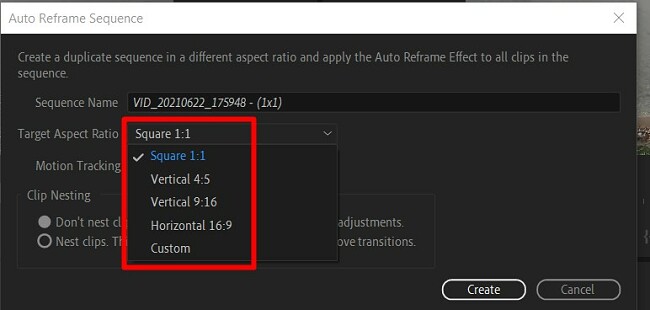
Setting the Auto Reframe dimensions
Try Adobe Premiere Pro for Free!
Professional Transitions and Effects
Premiere Pro has more than 40 video transitions to make a smooth jump from one video clip to the other. If you feel that you need more transitions, you can either install a transition plugin for a larger variety or create a custom transition in Adobe After Effect and upload it through the Creative Cloud library.
Using the Transitions is a simple drag-and-drop feature. Open the Effects menu to the left of your timeline and open the Transition Effect folder. Then, simply drag the file and place it at the beginning or end of the clip. You can see how the transition works by playing the clip and seeing it in the video preview.
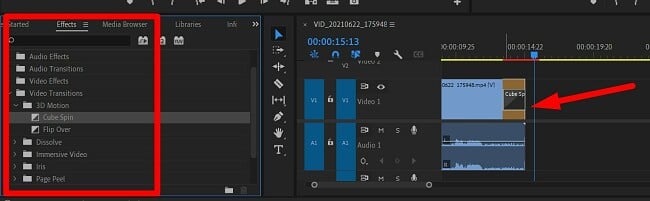
Drag and Drop the transition on your video clip
Premiere Pro comes with all the video effects that you need to correct lighting issues, change the coloring, and transform tool to ensure everything looks perfect.
In the latest update, Adobe added the Warp Stabilize feature that is included with After Effects to fix shaky video clips. There are several different options that you can use when stabilizing the videos, including cropping the video, choosing how smooth you want the video, and auto-scale the borders.
Create 360 Degree VR Ready Videos
Premiere Pro has the tools to produce 360-degree videos that can be viewed on most VR devices. You have the ability to change the view and angle so nothing gets missed. There is also the possibility of adding a 3D aspect to the video for those who don’t have a VR device, but the viewers will need those red and blue glasses to appreciate the full effect.
When you produce the video, make sure you tag it as 360-degree video so that sites like Facebook and YouTube will understand and treat it like a 360 video.
Multi-Camera Angle Editing
There is no limit to the number of camera angles that you edit with Premiere Pro. Highlight the clip you want to edit and open the multi-camera source sequence. The software will automatically sync the different clips based on several factors, including the audio, which is helpful in cases where there are no internal timestamps. The multi-camera editing gives you the ability to change the video angle while the original file is playing. Once you choose the angle you want, you can make all the edits you need to complete the scene.
Adjust the Colors
Adobe brought the Lumetri Color Tools to Premiere Pro. This gives video editors incredible flexibility when it comes to manipulating colors to set the video’s tone. You can change the white balance, increase or decrease exposure, and add highlights and shadows through the keyframes.
The Lumetri tool also has filters for the videos that can give you clip an HDR look, change it to a vintage style, or simply find a better color combination than what naturally appears on the screen.
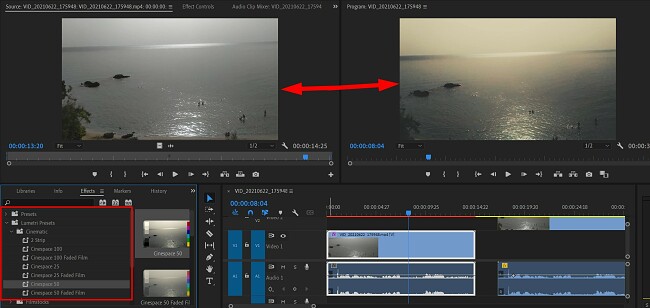
Use the Lumetri filters to adjust how your video clip looks
Ease of Use
Premiere Pro is a complex program with a lot of advanced tools. It’s much easier to learn if you already have some basic knowledge of video editing. That being said, as far as the editing tools are concerned, it is very intuitive, and if you have the basic background, you should be able to master the basics and advanced tools fairly quickly.
If you have no prior knowledge or background in video editing, I recommend taking advantage of the in-depth tutorials that Premiere Pro offers. There are both in-app guides, which give you hands-on experience, and tutorials through your browser that use videos to walk you through different editing techniques.
One of the great things about Premiere Pro is that it’s compatible with other Creative Cloud apps. It’s easy to design artwork in Photoshop or Illustrator or create some transitions or digital effects in After Effects, upload them to your CC Library and then import those elements to your video.
Interface
Premiere Pro uses the same dark-style layout as the other Adobe software. I find it difficult at times, but it helps keep the focus on the work, and not on the busy toolbars and panels.
The workstation is fully customizable, and you can choose which tools you want in the menu bar for quick access. The default workstation is made up of four sections:
- Original source preview on the top left side corner
- The project preview is located in the top right corner
- The project assets are organized in the bottom left corner
- The multi-track video timeline is on the bottom right side
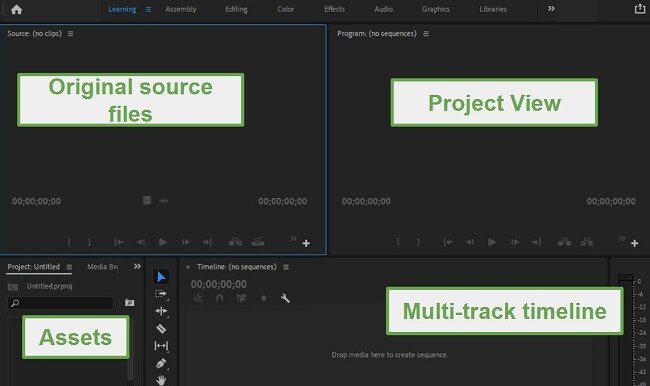
The four panels of the default workstation
In addition to the default workstation, Premiere Pro has several other preset workstations, such as Assembly, Editing, Color, Effects, Audio, and Titles. Each workstation has different tools, based on the type of work you’re going to be doing. It’s easy to switch between multiple workstations while working on your project. The workstations are listed on the top menu bar, and when you click on it, it will automatically change your layout, adjust visible panels, and tools.
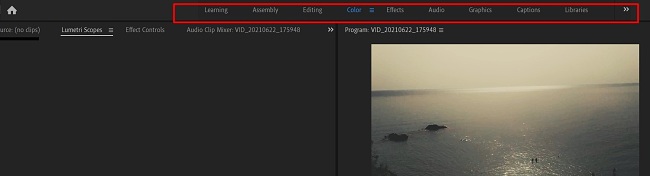
Find the best workstation for your project
It won’t affect the work you’ve already done. Just change the quick access tools and available panels.
The interface is very flexible and works with drag-and-drop capabilities. You can move panels around, dock them or undock them, and add or remove tools to the various menus, to streamline your work process and save you time from searching for specific tools or features.
Try Adobe Premiere Pro for Free!
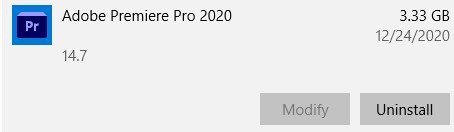
How to Uninstall Adobe Premiere Pro
At the end of your free trial, you can uninstall Adobe Premiere Pro in a few simple steps.
- Type Add or Remove Programs in the Windows search bar and press the Enter key.
- Find Adobe Premiere Pro in the list of installed programs and press the Uninstall button.
- The Adobe Creative Cloud app will open and check if you want to save your Premiere Pro settings on the computer. Choose Yes or No.
- The Adobe Uninstallation Wizard will run and completely delete Premiere Pro from your device.
How to Cancel Your Adobe Premiere Pro Account
When you cancel your account, you will instantly lose access to Premiere Pro. This means that you’ll have to cancel your account only when you don’t need to use it anymore. Follow these steps to cancel your account (If you don’t want to get charged, make sure to do it before the trial ends).
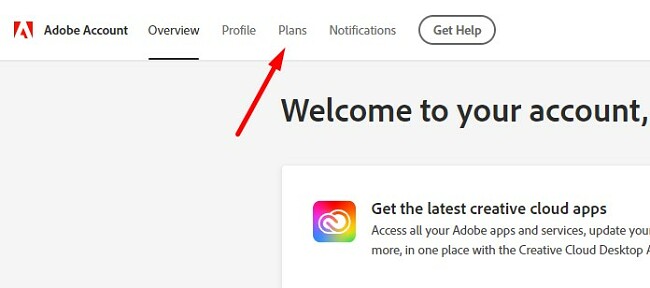
- Go to Adobe.com and log in to your account.
- Click on the Plans tab on the menu bar.
- Click on Manage Plans.
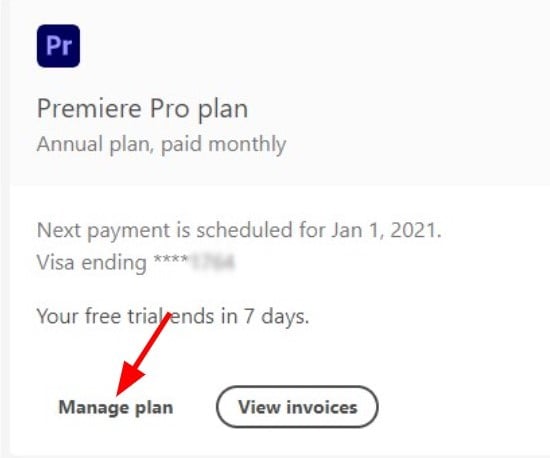
- Press the Cancel Plan button.

- You will have to answer a survey about why you’re closing the account. You can click on any answer and then press the Continue button.
- Adobe will try and create a better offer to convince you to purchase a subscription. If you’re not interested, press the continue button.
- On the bottom of the page is a Confirm button. Press this to cancel the account. Once this is done, you will lose access to Premiere Pro.
Additional Adobe Creative Cloud Apps
- Adobe Photoshop: The most complete pixel-based, digital editing software on the market has the tools you need to transform any picture into a work of art. Photoshop uses layers to give users the freedom to edit each object or text without affecting anything else on the page. You can add shadows and colors or cut and crop out parts of a layer without worrying that it will add these effects to the rest of the picture.
- Adobe Illustrator: Unlike Photoshop that works with pixels, Illustrator is a vector-based editing program. It has helpful features like a CSS Extractor Tool to ensure your work appears the same in Illustrator as it will after it’s published and a Color Synchronization feature to easily match the existing colors on the document with any work you’re doing.
- Adobe InDesign: Use InDesign to produce professional layouts for both digital and print publications. With helpful features like a Master Page function and a built-in word processing tool, you’ll have everything you need to design and publish your page or magazine layouts.
FAQ
Is Adobe Premiere Pro free?
Adobe Premiere Pro is part of the subscription-based Creative Cloud collection of apps. However, if you follow the instructions above, I’ll show you how to download it free for 7 days. This gives you time to test the software and possibly even finish working on a specific project.
Is Premiere Pro compatible with other Adobe Creative Cloud programs?
One of the big advantages of using Premiere Pro over other video editing programs is that it’s compatible with the entire suite of Adobe tools. You can edit images in Photoshop,InDesign, and Illustrator, and seamlessly integrate those files into your videos.
What happens at the end of the 7-day Adobe Illustrator trial?
You’ll be able to use Adobe Premiere Pro for as long as your subscription is active. To prevent unwanted charges, make sure to cancel your account before the free trial ends.
Visit Adobe Premiere Pro Website


