Using the Open Source GAM to Administer Google Workspace – Dito | Google Workspace, Google Cloud, Data Analytics, Cloud Migrations, Managed Services
Mục lục bài viết
What is GAM?
Project Home Page: https://github.com/taers232c/GAMADV-XTD3
Google Apps Manager, or GAM, is a command-line program to simplify managing Google Workspace installations.
It uses Google supplied APIs to perform its functions. It’s an Open Source Project licensed under the Apache Software Foundation License v2 aka ASLv2. It uses the command line interface (CLI) instead of a graphical user interface (GUI) to help with precision and automation. GAM is particularly useful for performing bulk operations.
GAM is the “Swiss Army” Tool that every Google Workspace Administrator should have at their fingertips.
The History of GAM
Ross Scroggs is an entrepreneur and programmer. He started professional programming in early 1974 and started his own software company a few years later. His firm specialized in HP-3000 computers and serial (RS-232C) communications and was sold in 2001.
After that, to stay busy, he started volunteering and helping schools with their technology. After installing Google Apps for Education (GAFE) now Google Workspace for Education at four schools, he quickly discovered that managing GAFE with admin console was not very efficient.
In 2013, he found GAM from Jay Lee and the rest is history…
What are the limitations of GAM?
GAM does have some limitations. When there are functions available in the Google admin console that aren’t supported in the Google APIs, GAM can’t perform those functions. For example, you can create and delete OUs but you can’t manage characteristics of the OUs such as disabling a service for an OU. GAM is not a complete replacement for the admin console.
Why GAMADV-XTD3?
To have more freedom with GAM, Ross created a fork called GAMADV though he continues to support Jay and the original GAM as well! Today, this fork is called GAMADV-XTD3 and is the preferred version of GAM for many Workspace administrators. Why does it have such an odd name? Ross Scroggs’ history starts with GAMADV which stands for GAM Advanced.
Later the name evolved with multiple branches denoting new features and new API support such as GAMADV-X and GAMADV-Y but even Ross has lost track of all the branches and their reasons.
But when Google’s Drive API version 3 that included support for Team Drives (now Shared Drives) came out, he created GAMADV-XTD to support this API.
And when Python 3 was released, he added 3 to the name as well.
Those other branches are no longer supported as of September 2019 and the product is now Google Apps Manager Advanced Extended Team Drive Python 3 or GAMADV-XTD3.
How do you install GAM?
There are two phases to installation, installing the executable and configuring the tool. Often configuring the tool is frustrating for new admins because of all the security hurdles you need to overcome for the APIs and ultimately GAM to work with the Workspace installation. Trust us, it’s worth the effort!
You must be a superadmin to install and configure GAM:
-
Or have an admin account for your domain with all the rights to the API scopes needed but that’s not a topic we will cover here.
-
Once GAM is installed, if a user is provided access to the installation, they will be able to use it with the permissions of the Google Workspace Project. See Below for more information. This can be a benefit or a major security issue. You need to protect your GAM installations and not leave them around on shared machines for others to poke around with.
-
You can also setup projects with less permissions and separate installations of GAM to delegate capabilities with appropriate principles of least privilege.
-
Stan Lee’s advice, “with great power, comes great responsibility,” applies. GAM is
very powerful
and you can do
extreme damage
to your Google Workspace installation.
Executable Installation
Because GAM is a program written in Python, you install it readily in multiple operating systems as long as you have a working Python interpreter which you can install as source. Ross has also provided standalone executables that reduce your steps.
For more information, see https://github.com/taers232c/GAMADV-XTD3 or some hints/tips below for first-time GAM users.
Linux/MacOS:
For first time users of GAM, you can either download the tar file, untar it, and install -OR- just use curl/wget/fetch to download and run the installer.
This command will do that and install GAM in your home directory, just follow the prompts:
bash <(curl -s -S -L https://git.io/fhZWP)
NOTE: This will prompt you to start the installation, create a project and more.
Windows:
First time GAM users on Windows will need to download the MSI, run the executable and follow the prompts.
Depending on your version of Windows, go to the GAMADV GitHub release page and search for an appropriate Installation “Asset”. For this blog, we’re using a Windows 10 64-bit architecture so we will download gamadv-xtd3-5.31.01-windows-x86_64.msi.
NOTE: The Windows version will not prompt you to create a project. See below for the configuration steps.
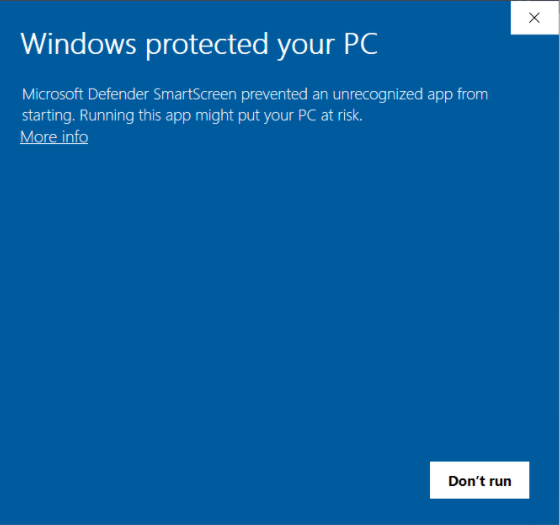
You may find that Microsoft Defender SmartScreen will trigger on GAM, click “More Info” and “Run anyway”.

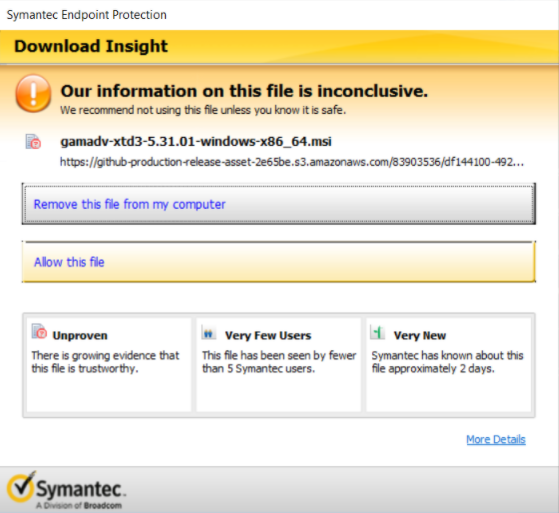
Other tools like Symantec Endpoint Protection will be unsure about the file as well. Click “Allow this file” to proceed.

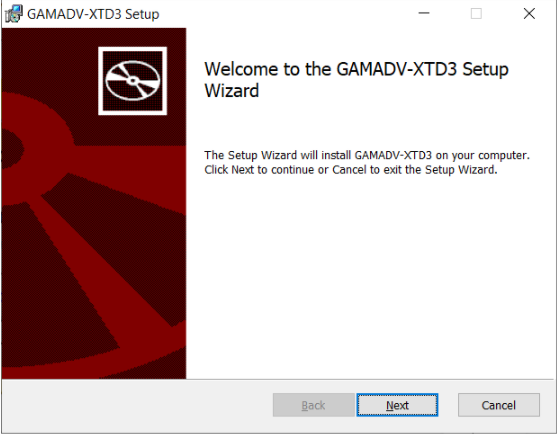
You will then reach the Setup Wizard prompt. Accept the terms and conditions and continue along to select the destination folder for the setup.

NOTE: GAM’s installer in Windows will automatically select the first network drive if available. For this test installation, we used “C:\Program Files\GAMADV-XTD3”
You may then get an Unknown Publisher warning which you have to accept as well. Hopefully, you now see a completion notice and can move on to configuring your instance!
NOTE: The destination folder for GAM will be added to your Windows environment variables for the Path automatically too! Make sure to start a new Cmd prompt or PowerShell window.
Post-Installation Configuration
For a first time GAM installation for a Workspace domain, you must setup permissions to give GAM access to the Google Workspace instance.
First, you need a Google API project which will identify your install of GAMADV-XTD3 to Google and keep track of API quotas.
Second, you will also give GAM authorization to act as your Workspace Administrator in order to perform management functions like adding users, modifying group settings, and pulling domain reports.
Finally, a special service account that is authorized to act on behalf of your users in order to modify user-specific settings and data such as Drive files, Calendars, and Gmail signatures.
Requirements:
-
You must be a Google domain administrator, likely a SuperAdmin. See caveat above.
-
You must have permissions on the Workspace domain to create projects. NOTE: We occasionally see people who do not have this permission. It’s rare, but it happens.
-
You must be able to login to
https://admin.google.com/
Configuration Step 1: gam create project
With the GAM executable, run the command and follow the prompts: gam create project
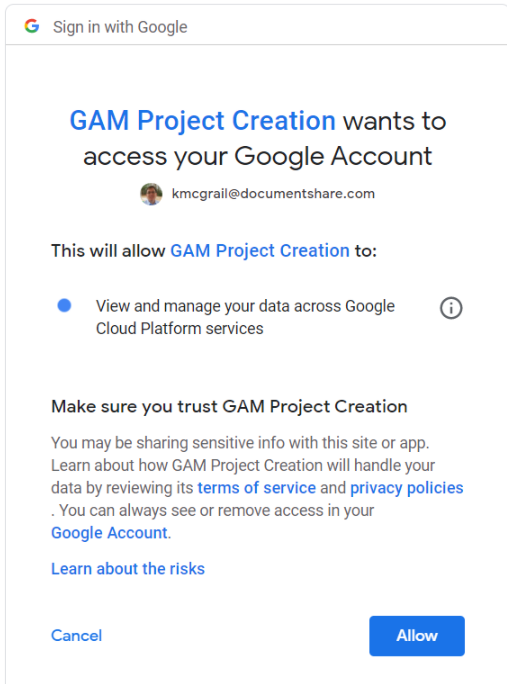
This will automatically create a randomly named project, prompt you for your admin email address and then launch a web browser to start the verification process.

Once you allow the GAM project creation to continue, GAM will continue with the project creation, authorizing the APIs and more!
Next, the output of GAM will give you a URL such as https://console.cloud.google.com/apis/credentials/oauthclient?project=gam-project-m29-13o-v7d which you have to manually open a browser to this URL to continue the setup of GAM by creating the OAuth client ID.
Make sure you read the requirements on the GAM installation:
-
Choose “Desktop App” or “Other” for “Application type”.
-
Enter “GAM” or another desired value for “Name”.
-
Click the blue “Create” button.
Once you have done this, the web browser will present you with your Client ID and the Client Secret. Cut and paste these into your GAM command line as prompted.
Now you will have two files for the project in a .gam directory in your home directory, (e.g. c:\userskmcgrail.gam or \home\kmcgrail\.gam) client_secrets.json and oauth2service.json
Configuration Step 1: API Access
The next step in configuring GAM is to configure GAM’s access to the APIs.
This uses two modes to access the APIs for different use cases of GAM:
Mode 1: Client – GAM manages resources as a system administrator.
Mode 2: Service Account – GAM manages a user’s resources while acting as that user.
Mode 1: Client
To authorize client access, the client_secrets.json is used by GAM to create the file oauth2.txt which provides the authorization for specific scopes.
gam oauth create
Select the scopes you desire though the default is highly recommended for most installations. Select continue and another website will be launched to allow access to the account such as:
ADVANCED TIP: You can limit the scope for GAM at this step AND by modifying the client_secrets.json file to just {}, the scopes cannot be expanded. See this page for more information: https://github.com/taers232c/GAMADV-XTD3/wiki/Authorization#configure-limited-access
Mode 2: Service Account
To authorize service account access, the oauth2service.json is used to login and authorize the desired service scopes. Run the following command replacing [email protected] with the account you have used throughout:
gam user [[email protected]] update serviceaccount
Select the scopes you desire though the default is highly recommended for most installations. Select continue and the output of GAM will give you a URL such as https://admin.google.com/ac/owl/domainwidedelegation?clientScopeToAdd=https://mail.google.com/,https://sites.google.com/feeds… with the complete list of the scopes you have requested.
Next you need to manually open a browser to this URL, authenticate and click authorize to approve the service account access.
Now you can check that your serviceaccount is ready to go with this command:
gam user [[email protected]] check serviceaccount
IMPORTANT: There can be a delay while the Google backend processes the update. Typically 15 minutes is enough time.
GAM should respond with output showing all the selected scopes pass
ADVANCED TIP: GAM can be installed on multiple computers, but only one project is required; the authorization files can be copied to multiple computers. See https://github.com/taers232c/GAMADV-XTD3/wiki/gam.cfg#multiple-computers
Some Top GAM Use Cases
-
The command line allows simple operations to be done quickly without have to navigate the admin console for Workspace.
-
Create, update, delete, and view the following: users, groups, devices, OUs
gam info user [[email protected]]
gam update user [[email protected]] firstname [new firstname]
-
Bulk operations allow changes that would be tedious in the admin console. For example, update a group and synchronize it against multiple OUs (this command is all one line):
gam update group middleschool sync members ous “‘Students/ClassOf2021′,’Students/ClassOf2022’,’Students/ClassOf2023′”
-
Some features of GAM are not even available in the admin console!
-
Scan for files with particular characteristics across multiple users, for example, this command would find all the users with classic Google Sites:
gam all users print filelist showmimetype gsite
-
Find all the presentation files on a domain:
gam all users print filelist showmimetype gpresentation
-
Need to get the file counts and total size for shared drives, see
https://github.com/taers232c/GAM-Scripts3/blob/master/GetTeamDriveCountsSize.py
-
Have a security issue where someone external to your organization needs to be removed from all shares? GAM can be used to find file ACLs referencing particular users/domains across multiple users. See
https://github.com/taers232c/GAM-Scripts3/blob/master/GetSharedWithUserDriveACLs.py
-
Need to use a CSV file to assign a license to a list of users with a log file of the output? This command would help do that (all on one line) after populating the CSV with a single column and replacing SKUID with the proper license SKU:
gam redirect stdout addLicense.log multiprocess redirect stderr stdout csv [addLicenses.csv] gam user “~Email” add license [SKUID]
-
See
https://github.com/taers232c/GAM-Scripts3
for many example scripts and recipes to solve real-world problems using GAM. GAM makes simple things simpler and makes bulk tasks possible. It’s well worth the time setting it up!
More Resources
GAMADV Project Home Page: https://github.com/taers232c/GAMADV-XTD3
GAM Scripts: https://github.com/taers232c/GAM-Scripts3
Wiki: https://github.com/taers232c/GAMADV-XTD3/wiki
Others’ Contributions: https://github.com/taers232c/GAMADV-XTD3/wiki/Other-Resources
GAM Discussion Group: https://groups.google.com/g/google-apps-manager
GAM Updates: https://github.com/taers232c/GAMADV-XTD3/wiki/GamUpdates
The original GAM: https://github.com/jay0lee/GAM


